Friday, March 30, 2012

The One With Olivia's Birthday Cake

Pretty cakes make me happy. Pretty doable cakes make me even more happier. And cakes that use no fondant and only delicious buttercream frosting make me happier still.

The whole theme of Olivia's first birthday party was based around the fact that I wanted to make a cake like the one described in Mockingjay, the third book of the Hunger Games series by Suzanne Collins. If you're familiar with the series (and you should get to be if you aren't already), Peeta makes a cake for Annie and Finnick's wedding that is covered in blue and green waves to commemorate their home district, which is known for fishing. Here's the version I came up with - and Mallory executed for me. Lovely, isn't it?

I made your run-of-the-mill Betty Crocker Devil's Food cake for the tiers and then, frosted it with buttercream deliciousness.

Perfect Buttercream Frosting
  • 1 cup (2 sticks) butter, at room temperature
  • 2 lbs powdered sugar
  • 2 teaspoons almond extract
  • 2 teaspoons vanilla extract
  • 4-6 Tablespoons milk or water*
In a medium mixing bowl, cream the butter on low. Still beating on low, gradually incorporate the powdered sugar, almond and vanilla. Add the milk or water, one tablespoon at a time, until you have reached your desired consistency of frosting. If you want to color your frosting, do it now, still beating on low to keep air bubbles to a minimum.

The waves were created using a medium star tip. We used  Wilton Tip #18. 

*This is all about preference. Your frosting will still taste great no matter which of these you choose. I even use almond milk and that tastes great. If you use milk, however, be sure to keep your cake refrigerated.
**To make this a chocolate buttercream, add one cup cocoa powder, which is what the chocolate frosting pictured below is.

I shared this recipe at some of my favorite link parties! See the "Sharing" tab!

Wednesday, March 28, 2012

The One With the Strawberry Pretzel Salad

Have you ever made something that tasted like a sigh of satisfaction? It was just so good and light and delicious in it's simplicity? Well, whether you have or not, you should really try making these:
I don't really know what to call them. So I'm going to call them Strawberry Pretzel Salads. I saw the idea here and it immediately reminded me of a salad my mom usually makes for Christmas that is so good my mouth is watering right now just thinking about it. I figured I would make my own version for Olivia's first birthday party. And make them in individual servings for the fun of it.

The following recipe makes 24 individual servings in 8 oz glass jars. Alternatively, you could make this in 2 9x13 in Pyrex dishes.
Strawberry Pretzel Salad

You will need 24 8oz. oven-safe jars. I used the ones made by Kerr and found them for pretty inexpensive at my local Fred Meyer/Kroger in the canning section.

Pretzel Layer
  • 3 cups crushed pretzel crumbs
  • 20 oz. (2 1/2 sticks) butter, melted
  • 1/2 cup sugar
Preheat oven to 350 degrees.
Crush pretzels to make crumbs. Don't make them too fine, you want the crumbs to be coarse. Melt butter. In a medium bowl, combine pretzel crumbs, butter and sugar using a fork. Distribute pretzel layer among the oven-safe jars - about one and half heaping tablespoons per jar. Use the bottom of a glass to press the pretzel layer down and make it firm - but not so firm that it will be impossible to eat. Place on a cookie sheet and then on the middle rack of the oven and bake for 6 minutes. Set aside to cool completely before adding the cream layer.

Cream Layer
  • 1 8 oz. package of cream cheese
  • 16 oz. container of whipped topping (like Cool Whip)
  • 1 cup sugar
Cream together the sugar and cream cheese first. Add the cool whip and combine thoroughly. To make it easier to distribute among your dishes, you may want to spoon the cream mixture into a gallon-size Ziplock bag. Cut off one corner of the bag and pipe the cream into the jars. Use a small spoon, like a baby spoon, to spread the cream until it is evenly distributed in each jar. Try to eliminate any holes in the cream so that the jello mixture won't leak through.
Refrigerate for 1 hour.

Strawberry Jello Layer
  • 2 lbs frozen sliced strawberries*
  • 4 cups boiling water
  • 2 6 oz. pacakges strawberry gelatin mixture
Boil the water. Use a whisk to combine the gelatin powder, stirring quickly until it is all dissolved. Add the frozen strawberries and stir to incorporate. Place in the fridge for about 5 minutes to allow it to set up slightly. 

Spoon the jello mixture onto the cooled crust and cream layers.  Refrigerate for at least an hour to overnight. Serve chilled.

*I later made this recipe using frozen mixed berries instead of just strawberries, and it was really, really good.

Everyone at the party really enjoyed these. They were easy to eat and incredibly tasty. Olivia went a little crazy for them. See?
This recipe is adapted from one I saw here. If you don't want to make 24, check that link for a 12-serving recipe. The fun thing about making these in individual dishes is that they make great left overs you could grab on your way to work, or, if you were willing to part with your jars, they would make excellent favors. They also become pretty kid friendly if you serve just the jello layer to young ones.

I shared this recipe at some of my favorite link parties! See the "Sharing" tab!

The One With the Grilled Sandwiches and Tomato Soup for a Crowd

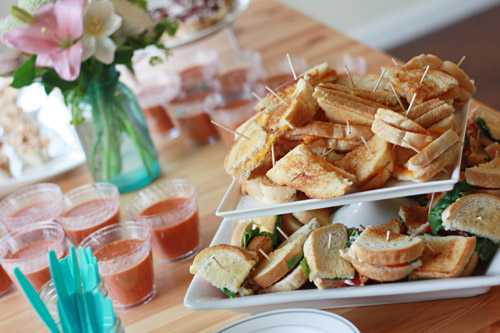
When I was coming up with menu for Olivia's first birthday party I really wanted something that would appeal to adults and kids alike. It's lots of fun to create appetizers and dishes adults will enjoy, but with lots of kids (nieces, nephews, and of course, the birthday girl) running around and being hungry, I knew that I needed something they could eat easily without making a huge mess all over my clean house. Enter... the grilled sandwiches. Grilled cheese for the babies and BLTs for the grownups. Of course, adults also liked the cheese ones. And for a little touch of yummy I provided some homemade tomato soup which is DELISH, if I do say so myself.
Not only are the sandwiches yummy and easy to eat (finger food, o yeah!), but they also look pretty cool stacked up like so. I put toothpicks in each quarter of a sandwich to make it easy to grab and munch. I figure it's better to eat things off skewers at parties so as to avoid having anyone need to sit down in order to manage their giant plates of difficult-to-consume food.

If you'd like to make some grilled sandies for a crowd you'll need
  • Bread (I like sourdough)
  • Butter
  • Cheddar cheese
  • Mayonaise
  • Bacon, fully cooked
  • Lettuce, washed and dried
  • Tomatoes, cut into slices
  • Salt and pepper to taste
  • Toothpicks 
I buttered one side of each slice of bread and grilled them until they were a nice golden brown. Of course, the cheese sandwiches were grilled until the cheese melted. For the BLTS, once the bread was grilled, you just slap some mayo on there, then lettuce, bacon and tomatoes. Finish with some salt and pepper. It's easy to get an assembly line going for this part.

Cut sandwiches into quarters and insert a toothpick into each piece for easy grabbing, dipping and munching.

And now for the
Tomato Soup for a Crowd

(Makes 20 mini servings)
  • 6 cloves garlic, peeled and diced
  • 3 Tablespoons olive oil
  • 2 28 oz. cans crushed tomatoes
  • 1 28 oz. can petite diced tomatoes
  • 4 cups chicken broth
  • 2 teaspoons sea salt
  • 2 teaspoons sugar
  • 1 tsp ground pepper
  • 2/3 cup heavy cream
  • 1 1/2 Tablespoons ground basil leaves
  • Parmesan cheese, for garnish
Peel and dice your garlic. In a large pot over medium heat, saute the garlic in the oil, being careful not to let your garlic burn. Once the garlic has turned a little golden, add the tomatoes, with all their juices, and stir to combine. Add the chicken broth, salt, sugar and pepper. Bring to a boil, then reduce heat and let soup simmer for 20 minutes. Remove from heat and stir in cream and ground basil leaves. 

Allow the soup to cool and then ladle it into individual serving cups, or into a large serving bowl. Sprinkle with Parmesan cheese and serve with pride.
Helpful hints:
This is pretty much just a doubled recipe. Halve it to have an easy family dinner.  I like to eat the leftovers for lunches.
It also keeps really well in the fridge, so feel free to make it several days ahead of time, freeing up your day-of duties if you're hosting.
This recipe was inspired by these two recipes. One and two.

I shared this recipe at Tastetastic Thursday on A Little Nosh
I was really excited when I stopped by Oh Happy Day! and saw that I wasn't the only one who thought grilled cheese and tomato soup was a good idea for a party. They classied up their sandwiches a bit more than I did... but still.. I felt cool. 

Tuesday, March 27, 2012

The One With Olivia's First Birthday Party

This little smooch had her first birthday party last weekend. It was pretty fun.
I themed the party with a sort of nautical, mermaid theme... well, not theme as much as color scheme. Aqua, teal, sea green and a few touches of gold for a little sparkle.  Here are few glimpses of the party details.
Menu:
I'll be sharing recipes in the next few posts. In the meantime, here's a list of sources for some of the items pictured above. Feel free to ask if you have any questions!

Sources:
My mom came from Idaho fro the party and did the flowers (I'm trying to pick up on all her talent... because she's incredible). Mallory frosted the cake and deserves big kudos! And, of course, a shout out to Steve and Allison who were very helpful in getting everything ready!

I shared this recipe at some of my favorite link parties! See the "Sharing" tab!

Sunday, March 25, 2012

Speechless Sunday

I don't know where this is from. but its beautiful.
We went to the zoo last weekend when my mom, sister and brother came to visit. It was a lot of fun. I'll be back soon with all the details from Olivia's first birthday party! But for today, we're relaxing and enjoying our first day off - with literally nothing to do - in months.

Tuesday, March 13, 2012

The One With the Almond Cake with Chocolate Buttercream Frosting

My friend, Allison, had her birthday party last weekend. And so I made her a modified version of the Pink Almond Party Cake. I made a double batch of the cake and then iced it with a Chocolate Buttercream Frosting... and here's the recipe, which makes a triple layer cake. I made the inside purple to match her party theme.

Almond Cake:
  • 2 boxes Betty Crocker Extra Moist White Cake Mix
  • 2 1/2 cups water
  • 2/3 cups vegetable oil
  • 6 egg whites
  • 4 teaspoons almond extract
  • Violet food coloring, plus just a tad of pink to brighten it up. 
Prepare your cake pans.  In a large mixing bowl, combine cake mixes, water, oil and egg whites, being careful not to over mix. Add almond extract and food coloring. Measure out your cake batter to make sure you use equal amounts in each layer. I believe, for my triple layer cake, I used 4 cups of batter in each layer, with some left over. Bake layers for 23-28 minutes. Let cakes cool in their pans for 10 minutes, and then on a wire rack for 1 hour. Once cakes have cooled completely, use a cake leveler to take off the rounded cake top so that the layers will fit together nicely.

Make your icing:

Chocolate Buttercream Frosting
  • 2 pounds powdered sugar
  • 1 cup (2 sticks) butter, at room temperature
  • 1/2 cup + 2 Tablespoons milk
  • 1/2 Tablespoons almond extract
  • 3/4 cups cocoa powder
Cream together butter, powdered sugar and 1/2 cup milk, beating on low to incorporate without getting too many air bubbles in the frosting. Add almond extract and cocoa powder. Add the remaining 2 tablespoons of milk only if you need it to make your frosting more workable and smooth. 

Put your cake together with the frosting in between each layer. I used Easter M&Ms for the border and edible butterflies by Wilton (available at Joann's or Michael's) for decoration.


Preheat the oven to 350 degrees.

Sunday, March 11, 2012

Speechless Sunday

I'm obsessed with pretty lettering. Like really bad. And therefore I think it is totally unfair that whoever did these is so talented while I am not. Except that they probably work very hard at their craft and therefore worthy of being swooned over.  (Via a dead link on Pinterest. I hate those.)

Thursday, March 8, 2012

The One With the Thin Mint Mousse Cups

Well it's that time of year again. That wonderful time of year when Girl Scout cookies make their lovely reappearance in the world. I thought I might celebrate this momentous occasion with some themed mousse cups, because, well, they're yummy.
Thin Mint Mousse Cups
  • 1 large (5.6 oz) package chocolate pudding mix
  • 1 small (3.4 oz) package vanilla pudding mix
  • 2 cups whipping cream
  • 4 cups cold milk
  • 1/3 cup sugar
  • 1/2 Tablespoon Mint Extract*
  • 6 drops green food coloring
  • One sleeve of Thin Mints**
  • Chocolate shavings, for garnish
Prep the layers:
In a medium size bowl, whip 2 cups of cream and 1/3 cup sugar on high for about 4 minutes, until stiff peaks form when you lift out the beaters.
In another bowl, combine chocolate pudding mix and 2 cups cold milk. Whisk for 1 minute to incorporate. Once the pudding begins to set and thicken, whisk in half of the whipped cream.  Set the other half aside for topping.
In another bowl, combine the vanilla pudding mix and 2 cups milk. Add the mint extract and green food coloring and whisk for 2 minutes until fully combined.
Let everything stand to completely set for at least 5 minutes.
Meanwhile, crush one sleeve of Thin Mints into medium-sized crumbs.

Assemble the layers:
Spoon two large spoonfuls of the chocolate mouse into parfait dishes, glasses or whatever kind of cup you have on hand. Add a layer of cookie crumbs. Next, add two large spoonfuls of the mint pudding and another layer of cookie crumbs. On top of that, the chocolate mousse and more cookie crumbs. Top with whipped cream and some chocolate shavings for garnish. Keep refrigerated until serving.

Makes 5 generous servings.
    *Mint Extract is not the same as Peppermint Extract. And mint really is better for this recipe. 
    **Even though this recipe calls for Thin Mints, I think it would be delicious with Oreos or Andes Mints        substituted in case you feel like making this during that dreary time of year when Thin Mints are no longer in your cupboard.

    This dessert is so refreshing. It would be perfect for St. Patrick's day... or really just a small dinner party. Of course you could always use a little less of each layer to make more cups for more people. I would recommend serving within an hour or two of assembly, although you could prep the layers up to a day in advance. Just be sure your whipped cream, mousse and pudding are stored in airtight containers in the refrigerator.


    I shared this recipe on Tastetastic Thursday by A Little Nosh and on Tip-Toe Thru Tuesday on Crayon Freckles. It was featured on the following Tip-Toe Thru Tuesday.

    Monday, March 5, 2012

    The One With Mama's Favorite Salad

    Sometimes you just need a little pick-me-up at lunch, you know? This is mine:
    Such a simple and yummy salad. A little sweet. A little savory. Here's how I make a personal serving:

    Apple and Craisin Salad
    • 2 cups mixed greens (romaine and red lettuce and spinach)
    • 1/2 Pink Lady apple, diced
    • 1/4 cup craisins
    • 1/4 cup sunflower seeds
    • 1/3 cup feta cheese (not pictured because I ran out that day)
    • Croutons
    • 2 Tablespoons poppy seed dressing
    I keep all these items on hand so that it's easy to throw together. And so much more grown up than grilled cheese sandwiches.  I especially like that it cures a sweet tooth on a long day.
    And I learned a cool trick for cutting down on your dressing if you're watching your calorie intake. Add all ingredients to a tupperware container that has a lid. Measure out the correct serving size of dressing (usually about 2 tablespoons). Close the lid and shake up. It will lightly coat your whole salad - so you get all the flavor with less dressing.

    Friday, March 2, 2012

    The One With the Watercolor Invitations

    Olivia turned one yesterday. The only thing keeping me from crying that my baby is growing up too fast is planning her birthday party. I like parties. They're fun.

    For Olivia's party, I'm using teal, aqua, mint and gold for the color scheme. Mostly oceany colors with gold as an accent for a little sparkle and pizazz. Anyway, I thought some watercolor invitations would be pretty, especially after I saw these adorable cards. So I made some of my own:
    Didn't they turn out so well? I love them!
    They're really pretty easy to make. All you need is:
    1. Watercolor paper
    2. Colored pencils
    3. Watercolors (Crayola works just fine)
    4. Medium flat brush (a sponge brush will suffice)
    5. Painter's tape
    To begin, you need whatever design and wording you want to use. While on my party supply hunt, I found an adorable Etsy shop called A Fabulous Fete.  Lauren is awesome and does beautiful calligraphy. I love pretty much everything about her little party store. So I asked her to write out the front of the card. I played around with it on Photoshop until it was in the layout I liked and then printed it.
    Here's how to make the cards:
    1. Use a colored pencil to trace your design onto watercolor paper. You can tape the design up against a window and trace it that way. Or, if you have a glass table, just put a lamp underneath it so you can trace your design. You must use colored pencils - the wax keeps the watercolor from adhering to that part of the paper, so your lettering shows up clearly. If you're working with thinner lettering, like I did, I would recommend using a a dark color so that everything turns out well. Thicker lettering lends itself better to the original idea, which is to use a white colored pencil to create negative space in your design.
    2. Use painter's tape to secure your paper to your work area. I'm classy and used cardboard boxes. 
    3. Get your brush wet, but not too wet, and dip it in the paint. Mix the paint however you like on the paper. I used a combinations of blues, yellow and white to get the effect I wanted. Experiment until you find the look you like.
    4. Let your paint dry for a few minutes. If the paint is too dark and the lettering is not showing up well you can use a paper towel to dab away some of the paint. 
    Beyond that, it's up to you. I put mine on cardstock and added the party information to the back. I would suggest setting the cards under a heavy book in order to flatten them out, since the watercolor causes the paper to warp.
    I shared this at Tip-Toe Thru Tuesday on Crayon Freckles

    Thursday, March 1, 2012

    The One Where Olivia is One Year Old

    Can you believe this little smooch is a whole year old today?
    Just a year ago today I was showing her off to all our hospital visitors. She had just met her big sister. She had already shown us what a sweet little girl she would turn out to be.

    So much has changed. And I'm so thankful I've had a whole year of snuggling her. And kissing her. And showing her off. There aren't many words to describe how much I love this little girl. I mean, what's not to love?
    Dear Olivia,

    Thank you for the joy and light you have brought us every day for a whole year. I can't imagine our little family without you.

    You've weathered some tough storms - a move, several airplane and road trips, a big sister who is learning how to be nice and share. But you've also had some fun. You took your first trip to Disneyland. And you went to Texas and Louisiana (over 4,000 miles altogether). You have loved visiting your aunts and uncle in Idaho and playing with all the dogs and cats.

    Everything you do is done with such sweetness. You have a gentle spirit and an adventurous nature. You love to explore and try new things. You'll eat just about anything, except tortellini. You aren't afraid of anything. And you make your opinions known as well.

    You like pretending to talk on the phone. You even pretend to take pictures with it. And you love to dance. Swing seems to be your favorite so far.

    You love to read and play with your dollhouse. And you adore playing with blocks. But not as much as you adore this little doll that talks and makes baby noises. You light up whenever we tuck her into bed with you. It's very precious.

    And you have an amazing flying leap that makes everyone giggle. It's a little ape-like. So I like to call it "The Missing Leap." Get it? No? You're only one? Ok.

    Well, baby girl, I'm going to go make you some brownies and see if there's a way I can keep you from getting any bigger on me. I just love how sweet and snuggly you are. Please don't ever lose that.

    All my love, always,
    Mommy
    Related Posts Plugin for WordPress, Blogger...