Showing posts with label Dinner. Show all posts

Thursday, June 28, 2012

The One With My Favorite Summer Sandwich

Just thought I'd pop in to tell you I'm a big fan of sandwiches. They're so tasty. So easy. And so summery. Seriously... I love delis because of their sandwiches. And their cookies. Cookies are good, too.

But back to sandwiches. My sister and I had an a-mazing sandwich from Bridge City Cafe a few days ago, and it was so good we had to replicate it ourselves. You should, too. You'll be happy you did.
Favorite Summer Sandwich
Serves 1
  • Artisan Bread (I like sourdough)
  • Mayonaise
  • Pesto
  • 1/6 pound sliced deli turkey
  • 1/2 cucumber
  • Roma tomato
  • 1 leaf romaine lettuce
  • Salt and Pepper to taste
Begin with spreading a little mayonaise and pesto on both slices of your bread. Peel the cucumber and slice it lengthwise. Slice the tomato as well. Layer the lettuce, cucumber and tomato on your bread, topping with turkey and sprinkling with salt and pepper.

Enjoy with a tall glass of lemonade. It is summer, after all (or at least it's trying to be)!

P.S. The original Turkey Bacon sandwich from Bridge City Cafe had bacon, obviously. We were too lazy to have some of our own, but it was good. So if you like bacon, feel free to add some of that as well.

Thursday, June 14, 2012

The One With the Homemade Pizza Dough

Sometimes, even after I post a recipe, I decide that it needs to be improved upon. Or as I make it a couple more times I make adjustments that prove to be worthwhile. Normally, I just edit the original post. But this one seemed like it deserved a re-post.

In the original post, Mama Style Homemade Pizza, I used pre-made Pillsbury Pizza Dough. Although it is extremely convenient if you don't have a Kitchen Aid with a dough hook or a bread maker, it is also a bit difficult to work with and pricey. So when I got my Kitchen Aid, I was crazy excited to make my own dough. (And when I say "crazy excited," really, you have no idea. I literally mean "crazy.")

Anyway, I found this incredibly easy recipe for homemade pizza dough. It's much more maneagable and just about free considering everything it requires is likely in your cupboard. If you like making pizza or bread a lot, I would recommend buying jars instead of packets of yeast. It's much more cost effective.

And because I've also perfected the pizza toppings, I'll give you the updated recipe for that, too. Make away!
Homemade Pizza
(Makes one medium pizza / 4 servings)

Preheat oven to 350 degrees.

Dough from Scratch
  • 2 teaspoons active dry yeast (or one 1/4 ounce packet)
  • 1 cup warm water
  • 2 cups all-purpose flour
  • 2 Tablespoons olive oil
  • 1 teaspoon salt
  • 2 teaspoons sugar
In a small bowl, sprinkle the yeast on top of the warm water. Set aside for ten minutes, until foamy.
Using a dough hook (or a bread maker, according to manufacturer's directions), combine water/yeast mixture with flour, olive oil, salt and sugar. Stir to thoroughly combine. Set aside to rise for 30 minutes, until doubled in size.

Meanwhile, prepare your pizza toppings

Toppings
  • 1/3 - 1/2 pound Mozzarella cheese, sliced
  • 1 1/2 (14 ounce) cans petite diced tomatoes
  • 1 garlic clove, minced
  • Pepperoni, sliced
  • 1/2 Tablespoon basil
  • 1/2 Tablespoon oregano
  • Olives, diced
  • Parmesan cheese, shredded
  • 2 Tablespoons olive oil
Once your dough is ready, pour a small amount of olive oil into your palm and rub it all over your clean hands. This will make the dough easier to handle. Mound your dough into a ball and drop it onto your prepared pizza pan or stone (some require oil, some corn starch, etc.). Work the dough out into a pizza shape, using the heel of your hand to make it as flat and thin as possible. Once you have a circle, use your fingers to roll a crust.

Starting on the outside and working your way towards the center of the dough, arrange your Mozzarella cheese in a tile-like placement until the dough is covered. Drain the tomatoes and then sprinkle them on top. Sprinkle the minced garlic evenly over the tomatoes. Arrange the pepperonis in a circular fashion. Sprinkle the basil and oregano over the pepporoni. Top with olives and Parmesan cheese. Finally, drizzle with olive oil.

Place in preheated oven and cook for about 20-25 minutes, until cheese is melted and crust is golden brown. You can even use a spatula to lift the pizza slightly and check the underside for done-ness.

Allow to cool for a few minutes, slice up and serve. :-) Maybe you should make some root beer floats featuring Madagascar Bourbon Vanilla Ice Cream for you dessert...

Wednesday, May 16, 2012

The One With the Quinoa and Veggie Salad

More deliciousness in the vegan department! I'm not missing meat at all these days. Butter and sour cream, perhaps... but not meat!

This salad is wonderfully fresh and very filling. It has a nice, smooth flavor that is a guaranteed crowd pleaser. It was inspired by Maria's  (of Two Peas and their Pod) Black Quinoa Salad. If you are looking for Vegan or Vegetarian meal ideas, they have a pretty good arsenal. And everything I've tried of theirs is very, very good.   
Quinoa and Veggie Salad
(Serves 4)
  • 1 cup dry red quinoa
  • 2 cups vegetable broth
  • 4 green onions, diced small
  • 1 avacado, diced medium
  • 2 tomatoes, diced medium
  • A small handful of cilantro, chopped small
  • 1/4 cup lime juice
  • 1 Tablespoon olive oil
  • 1/4 teaspoon ground cumin
  • Salt and pepper to taste 
In a medium saucepan over medium heat, bring the quinoa and vegetable broth to a boil. Let boil for five minutes and then reduce heat to low and let simmer for 15-20 minutes, until broth is all absorbed. Remove from heat and fluff with a fork.
Meanwhile, chop your veggies and have them ready to add to the quinoa.
Make your dressing: in a small bowl combine lime juice, olive oil and cumin. Whisk together and then drizzle over your salad. Toss with a fork to coat evenly and enjoy!

Check out the "Linked and Featured" tab to see where I shared this!

Tuesday, May 15, 2012

The One With the Vegan Tacos

We've been working on eating better these past few weeks. I've been trying vegan and vegetarian meals as often as possible.
Part of this was spurred on by the rising cost of meat... and the fact that I am cheap, cheap, cheap. I just can't bring myself to spend over $8 on chicken just for one meal. Combine that with the documentary Forks over Knives, and it's enough to try something new. And let me say, I am really enjoying trying so many new things in the kitchen. I love eating so fresh, and saving money, too!
Vegan Tacos
(Makes 6)
  • 1 1/2 cups Cuban Black Beans or 1 can black beans, drained and heated
  • 1 1/2 cups brown rice
  • 1/2 red onion, diced medium
  • 4 small red and orange peppers, diced small
  • Small pinch of cilantro
  • 2 teaspoons lime juice
  • 6 corn tortillas
  • 4-6 Tablespoons olive oil
I used Cuban Black Beans because I had some leftover, and they were delicious. But regular black beans would work well, too.  Dice red onion and peppers. Take a small pinch of cilantro and chop it up nice and tiny. In a small bowl, pour the lime juice over the brown rice and fluff with a fork.
Pour 3 tablespoons of oil into a medium, shallow skillet over medium-high heat. Allow to heat for about 3 minutes so that the oil is really hot. Place one tortilla in the oil. It should bubble up immediately if your oil is hot enough. Using tongs, turn the tortilla over to fry the other side. Flip the tortilla back and forth 3-4 times. Remove from pan, allowing excess oil to drip off and set aside. The goal is to soften the tortillas and enhance the flavor a bit for the tacos. If you run low on oil, add more, one tablespoon at a time. Again, you don't need anything deep-fried. Just softened and yummified a bit.
Once the tortillas are cool enough to handle, assemble your tacos. Begin with a layer of 1/4 cup black beans, then 1/4 rice with lime per taco. Add the veggies as desired and top with a sprinkle of cilantro.
These are really delicious and surprisingly filling. Such a wonderful meat-less option that will keep everyone happy!
To make it baby-friendly, simply add all the ingredients in a little bowl and tear a tortilla into small pieces. Stir together and let them eat it with their fingers or a fork, depending on how advanced they are.

Check out the "Linked and Featured" tab to see where I shared this! 

Wednesday, April 11, 2012

The One With the Yumm Bowls

You know those days when you're out of food but you really don't want to go to the grocery store? Well, I had that sort of day last week. Fortunately for me, my dear friend Amy had shown me this amazing recipe that basically uses leftovers and pantry supplies. And now that I know that, I'm going to make sure the supplies are on my regular grocery list so I can make this whenever. Because it is good. 

Yumm bowls are basically anything you want to put in a bowl - think beans, rice, veggies, and any kind of meat you have. Or make it vegetarian since it is full of protein if you have it with Cuban Black Beans. The only necessary ingredient to Yumm bowls is Yumm Sauce from Cafe Yumm. (If you don't live in or around Portland, you can go to their website to order the sauce from their distributor. It's good - and versatile! You can use it for Yumm Bowls, obviously, but also as a spread for sandwiches.)
The first thing I put in my Yumm Bowls was Cuban black beans. They are ridiculously easy to make if you've got some canned black beans in your cupboard. Here's how I adapted this recipe:

Cuban Black Beans
  • 2 (10 ounce) cans black beans
  • 2 Tablespoons olive oil
  • 1 medium onion, chopped
  • 4 garlic cloves, minced
  • 1 teaspoon cumin 
  • 1/2 teaspoon oregano
  • 1/2 teaspoon salt
  • 1 tablespoon red wine vinegar (optional)
In a medium pot over medium heat, saute the onions in the oil. Add the garlic and saute for about a minute, being careful not to burn. Pour the liquid from on of the cans of beans over the garlic and onion and cook until everything is tender. Add the beans and liquid that remain. Add the cumin, oregano and salt and simmer for 30 minutes. If you'd like to add the vinegar, stir it in just before serving. 

So the things that were in my cupboards/fridge that ended up in the meal:

Yumm Bowls
(Serves as many as you like, depending on what you add)
  • Cuban black beans (see above)
  • 2 cups cooked brown rice
  • Green onion, chopped
  • Roma tomato, chopped
  • Chicken, grilled and diced
  • Tortilla chips for dipping
 You could also add:
  • Avacado
  • Red or green peppers
  • Cucumber
  • Olives
  • Celery
  • Anything you can think of
Prepare your bowls by starting with a bed of rice. Add a layer of Cuban black beans. From here, let people make their own - adding whatever veggies they'd like. Top it off with some Yumm Sauce and serve it with tortilla chips and you're good to go. (You can either dip the chips or crush a few on top of the sauce for a little added crunch without all the calories.)
There are several pluses to the Yumm Bowls:
  1. Once you have the sauce, you can make just about anything into a Yumm Bowl.
  2. Yumm Bowls are a great way to use leftovers - any meat or veggies hanging out in your fridge and careening towards their expiration date.
  3. It's easy to keep the dry or canned ingredients (rice and black beans) in your pantry for rainy days. 
  4. Kids like this - especially if they like dipping. And the sauce can disguise those veggies.
  5. This meal is insanely cheap. Especially if you're awesome like my friend Amy and make the Cuban black beans from dry beans instead of canned.
  6. It is easy to make this a crowd pleaser. Provide lots of veggie options and everyone can pick whatever they want to put in their bowl. 
Check out my "Linked and Featured" tab to see where I linked this recipe up!

    Monday, April 9, 2012

    The One With the Mama Style Homemade Pizza

    Did you know it's hard to take an attractive picture of pizza? Well it is. But even though this picture doesn't do it justice, this pizza is really, really, really good.
    Ever since my revolutionary discovering of pre-made pizza crust, I've been craving this a lot. Plus, it's a big crowd-pleaser, so I like making it when friends come to visit.
    Mama Style Pizza
    • 2 Pillsbury pre-made pizza dough* (or see my recipe for homemade dough here)
    • Mozzarella cheese, shredded or sliced.
    • 2 14 oz. cans petite diced tomatoes, drained
    • Pepperoni
    • 1 clove garlic, minced
    • Parmesan cheese
    • Olives, sliced
    • 1 teaspoon basil
    • 1 teaspoon oregano
    • 3 Tablespoons olive oil
    Preheat oven as directed on your pizza dough package. 
    Roll your pizza dough out onto an oiled pizza stone, pan, or a Pyrex dish.
    Cover the bottom with a good coat of mozzarella.
    Add a layer of diced tomatoes. Arrange your pepperoni in a circular fashion around the pizza until it is covered. Disperse parmesan cheese and olives evenly over the pepperoni.
    Sprinkle with basil and oregano. Drizzle olive oil over the top and bake for 17-25 minutes, as directed on the pizza dough package.
    The light sweetness of the Pillsbury dough makes this pizza an excellent party choice if you're a fan of beer. And even more excellent if you're, say, having a beer tasting party.
    *You can use any kind of dough you like, really. If you have a favorite that you try with this, I'd love to know how it turns out! I'm always on the look out for new recipes or things to try. :-)

    Check out my "Linked and Featured" tab to see where I linked this up!

    Friday, April 6, 2012

    The One With the Chicken Bacon Ranch Pizza

    Have you met Papa Murphy's Chicken Bacon Rach pizza? If not, you should. It sort of inspired this recipe... although I wouldn't really say they taste extremely similar. Mostly, this is just a yummy white pizza recipe. So if you like that sort of thing... give it a shot.

    Some of my favorite food-related memories are from my mom's home-made deep dish pizza. I've been dying to make my own for a while but I currently don't have a Kitchenaid or a bread maker... making the pizza dough making party difficult (not impossible, but daunting, nonetheless). Little did I know they have ready-made pizza dough in the refrigerated aisle of the grocery. *Happy dance!* So now I can finally make my own pizza, and believe me, it's going to be happening quite a bit. If you try this (or come over and I make it for you), you'll see why.

    I really wanted to make the pizza like my mom does, which I'll share tomorrow. But Steve loves white sauce, so I found this recipe online and then made him his pizza based somewhat on our favorite from Papa Murphy's.
    Chicken Bacon Ranch Pizza

    White sauce:
    • 2 Tablespoons butter
    • 3 Tablespoons flour
    • 1 cup milk
    • 1/4 teaspoon salt
    • 1/4 teaspoon pepper
    • 2 garlic cloves, minced
    • 1 tsp dried basil leaves
    • 1/2  cup Italian cheeses, shredded (Parmesan, 
    Pizza toppings:
    • 1 1/2 - 2 rolls of Pillsbury pre-made pizza dough
    • White sauce (see above)
    • Olive oil
    • Chicken, grilled and diced
    • Bacon bits
    • 1/2 cup red onion, diced small
    • 1 tomato, diced small
    • 1 cup Italian cheeses, shredded (any combination of mozzarella, provolone, romano,
      parmesan, fontina and/or asiago should work just fine)
    • Ranch dressing
    Preheat your oven according to the directions on the pizza dough package.
    Cook your chicken and bacon. Chop all your vegetables and have them ready to go.
    Oil a pizza pan - the pizza stones from Pampered Chef are amazing. But if you have nothing else, a 9x13 Pyrex pan works very well, too, especially for creating a deep-dish style of pizza. 
    Make the white sauce:
    In a small saucepan, melt the butter over medium heat. Add flour and stir together. Add the milk gradually, whisking to incorporate. Stir in remaining ingredients. The sauce will thicken as it stands.
    Spread sauce onto your pizza dough and then add the chicken, bacon, tomatoes, and red onion. Sprinkle with your cheese. Finally, drizzle ranch dressing over the top of everything. Use as much or as little as you'd like.
    Bake according to the directions on your pizza dough package, 17-25 minutes, until cheese is melted and pizza crust is golden brown.
    Serve with root beer, of course. 
    Also, feel free to make extras of this. According to Steve, it is even more amazing the next day.  

    Check out my "Linked and Featured" tab to see where I linked baby this up!

    Wednesday, March 28, 2012

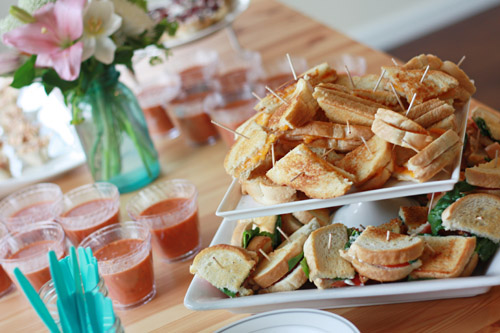
    The One With the Grilled Sandwiches and Tomato Soup for a Crowd

    When I was coming up with menu for Olivia's first birthday party I really wanted something that would appeal to adults and kids alike. It's lots of fun to create appetizers and dishes adults will enjoy, but with lots of kids (nieces, nephews, and of course, the birthday girl) running around and being hungry, I knew that I needed something they could eat easily without making a huge mess all over my clean house. Enter... the grilled sandwiches. Grilled cheese for the babies and BLTs for the grownups. Of course, adults also liked the cheese ones. And for a little touch of yummy I provided some homemade tomato soup which is DELISH, if I do say so myself.
    Not only are the sandwiches yummy and easy to eat (finger food, o yeah!), but they also look pretty cool stacked up like so. I put toothpicks in each quarter of a sandwich to make it easy to grab and munch. I figure it's better to eat things off skewers at parties so as to avoid having anyone need to sit down in order to manage their giant plates of difficult-to-consume food.

    If you'd like to make some grilled sandies for a crowd you'll need
    • Bread (I like sourdough)
    • Butter
    • Cheddar cheese
    • Mayonaise
    • Bacon, fully cooked
    • Lettuce, washed and dried
    • Tomatoes, cut into slices
    • Salt and pepper to taste
    • Toothpicks 
    I buttered one side of each slice of bread and grilled them until they were a nice golden brown. Of course, the cheese sandwiches were grilled until the cheese melted. For the BLTS, once the bread was grilled, you just slap some mayo on there, then lettuce, bacon and tomatoes. Finish with some salt and pepper. It's easy to get an assembly line going for this part.

    Cut sandwiches into quarters and insert a toothpick into each piece for easy grabbing, dipping and munching.

    And now for the
    Tomato Soup for a Crowd

    (Makes 20 mini servings)
    • 6 cloves garlic, peeled and diced
    • 3 Tablespoons olive oil
    • 2 28 oz. cans crushed tomatoes
    • 1 28 oz. can petite diced tomatoes
    • 4 cups chicken broth
    • 2 teaspoons sea salt
    • 2 teaspoons sugar
    • 1 tsp ground pepper
    • 2/3 cup heavy cream
    • 1 1/2 Tablespoons ground basil leaves
    • Parmesan cheese, for garnish
    Peel and dice your garlic. In a large pot over medium heat, saute the garlic in the oil, being careful not to let your garlic burn. Once the garlic has turned a little golden, add the tomatoes, with all their juices, and stir to combine. Add the chicken broth, salt, sugar and pepper. Bring to a boil, then reduce heat and let soup simmer for 20 minutes. Remove from heat and stir in cream and ground basil leaves. 

    Allow the soup to cool and then ladle it into individual serving cups, or into a large serving bowl. Sprinkle with Parmesan cheese and serve with pride.
    Helpful hints:
    This is pretty much just a doubled recipe. Halve it to have an easy family dinner.  I like to eat the leftovers for lunches.
    It also keeps really well in the fridge, so feel free to make it several days ahead of time, freeing up your day-of duties if you're hosting.
    This recipe was inspired by these two recipes. One and two.

    I shared this recipe at Tastetastic Thursday on A Little Nosh. 
    I was really excited when I stopped by Oh Happy Day! and saw that I wasn't the only one who thought grilled cheese and tomato soup was a good idea for a party. They classied up their sandwiches a bit more than I did... but still.. I felt cool. 

    Friday, November 18, 2011

    The One With the Nacho Bake

    As a mom, I am always looking for healthy meals that can fills my babies up with protein and vegetables. Enter: the nacho bake! It uses fewer tortilla chips than regular nachos and has lots of protein and veggies. It is also really easy to make double the meat and beans one night and save it for a few nights later. That way, on the second night, you only have to chop your vegetables and assemble and you have a super quick meal ready!
    Nacho Bake
    • 1 pound ground beef
    • 4 tablespoons taco seasoning
    • 3/4 cup water
    • 1 can refried beans
    • 3 Roma tomatoes, diced
    • 2 bushels green onions, diced
    • Cheddar cheese
    • Tortilla chips
    Preheat oven to 350.
    Cook ground beef in a medium skillet over medium heat until browned. Add water and taco seasoning and stir together. Bring to a simmer and then reduce heat. Simmer on low for 5 minutes. Add refried beans and stir to incorporate.
    In a 9x13 inch pan, break tortilla chips along the bottom to form a crust layer. Spread the beef and bean mixture on the chips and sprinkle 3/4 of the tomatoes and green onions over the top. Top with cheddar cheese. Bake for 20 minutes.
    Cool for 5 minutes and then top with remaining tomatoes and onions and sprinkle some broken chips on top for a little added crunch.
    Serve with a dollop of sour cream and enjoy!

    Thursday, November 17, 2011

    The One With the Turkey and Stuffing Bake

    If you're impatient for Thanksgiving to get here, like I am, this could help hold you over. It's basically Thanksgiving in one dish. It's amazing. Of course, this would be good all year round, too.
    Turkey and Stuffing Bake
    • 1 pound ground turkey (preferably pre-seasoned with Italian seasonings)
    • 2 Tbls olive oil 
    • 3 Tbls flour
    • 1 1/2 cups chicken broth
    • 1 10.5 ounce can cream of chicken soup
    • 1 1/2 cups water
    • Salt and pepper
    • 1/2 yellow onion, diced medium
    • 3 celery stalks, diced medium
    • 1 loaf crusty white bread, cut into large cubes
    • 2/3 cup dried cranberries
    • 2 eggs
    • 2 Tbls butter
    Preheat oven to 450 degrees.  In a large skillet, heat 1 tablespoon olive oil. Add ground turkey and cook until browned. If you used unseasoned turkey, add sage and any other spice you'd like. Add the flour and stir to coat. Add chicken broth and cook, stirring until liquid thickens, about 2 minutes. Season with salt and pepper and transfer to an 8x8 Pyrex or other baking pan.

    Rinse out skillet and pat dry. Heat 1 tablespoon olive oil. Add onion and celery and cook until tender, 8 minutes. Remove from heat. In a separate bowl, stir together the cream of chicken soup and water. Add that, along with the bread and cranberries, to the onion and celery mixture. Toss until combined. Stir in eggs. Spoon bread mixture over turkey mixture. Cut the butter into small pieces and distribute over the bread mixture. Bake until juices are bubbling and bread is golden brown, 20-25 minutes. Let stand 10 minutes before serving.
    This recipe is a variation of one I saw in Martha Stewart's Everyday Food magazine. It originally called for 3 1/2 cups chicken broth instead of 1 1/2 cups chicken broth and 1 can cream of chicken soup, plus 1 1/2 cups water. But I ran out of chicken broth. I think it turned out really great this way, but you can also try it the other way!

    And even if you're not a big fan of cranberries, I would really suggest you incorporate them. They really add something special to the dish. It's like a full Thanksgiving dinner in every bite. Now if only it incorporated some mashed potatoes...

    Linked up at Tastetastic Thursdays on A Little Nosh. Featured on Weekend Spotlight.

    Monday, November 14, 2011

    The One With the Commons-Style Chicken Wraps

    Oh, the good old days. For me, at least for now, "the good old days" refers to being a freshman in college. I had awesome roommates, awesome classes and an all-you-can-eat meal ticket combined with a non-existent fear of the Freshman Fifteen (which is, of course, how I came by those pounds eventually). Not an insignificant highlight of each week was Chicken Wrap Tuesdays. At lunch time, the Commons, our all-you-can-eat buffet provider, served chicken wraps. And they were so. very. good. It didn't matter that you had to stand in line for forty-five minutes to get one. So the roomies and friends and I all met up for lunch on Tuesdays so we could all enjoy the wonder that is a chicken wrap together.

    Even before I attended the University of Portland, the legend of the Chicken Wrap had reached my ear. The summer before I started my friends, Jenny and Mia, brought home the chicken wrap deliciousness and gave me my first taste. I've been hooked ever since. 

    Fast forward x amount of years later and I no longer have a free pass to Chicken Wrap Tuesdays. No worries, though, I have found the perfect recipe for making them at home:
     Chicken Wraps
    • Mission's Garden Spinach Herb Wraps
    • Rice (fully prepared)
    • Chicken breasts
    • Romain lettuce
    • Tomatoes, diced, if desired
    • Olives, sliced, if desired
    • Ranch dressing
    Cook your rice as directed. Dice the chicken breasts and cook them over medium heat. Once they are fully cooked, drain any excess juices and return to stove. Still over medium heat, add 3 tablespoons of olive oil as well as garlic salt and any other chicken seasonings you desire. Grill the chicken pieces until they have nice, crispy edges (do not overcook). 
    Microwave each wrap individually (so they don't stick together) for about 10 seconds. Place open on a plate and add 2/3 cup rice, bits of lettuce, chicken pieces and tomatoes and olives, if desired. Drizzle with ranch dressing. Close up and enjoy!

    Wednesday, November 9, 2011

    The One With the Chicken Korma

    Steve loves Indian food. He likes to get it from the carts downtown. But that can get expensive after awhile, so he asked me to try to make some. I was hesitant at first, but then I found this recipe that seemed pretty doable. I've made it a few times since, simplified the recipe a bit and served it to plenty of people who are big fans. So now I'm passing on my version to you! This recipe is very mild, so no worries if you aren't big into spicy food-ventures.
    Chicken Korma:
    • 4 Tbs olive oil
    • 2 bay leaves
    • 3 cloves garlic, peeled and diced
    • 1 yellow onion, diced small
    • 2 tsp ground ginger
    • 1 tsp ground coriander
    • 1 tsp ground turmeric 
    • 1 tsp cumin
    • 1 tsp chili powder
    • 3 boneless, skinless chicken breasts, diced
    • 1/4 cup tomato sauce
    • 1 cup chicken broth
    • 1/2 cup plain yogurt
    • 1/2 cup heavy cream
    • 1 tsp cornstarch mixed with 1 tsp water
    • Salt for seasoning
    Heat oil over medium heat in a large pan or wok. Cook bay leaves in hot oil for 30 seconds. Stir in diced onion and cook until tender, 3-5 minutes. Mix in garlic, ginger, turmeric, coriander, cumin and chili powder.
    Stir in chicken pieces and cook for about 5 minutes.
    Pour in tomato sauce and chicken broth, reduce heat, cover and let simmer, stirring occasionally, for 15 minutes.
    Add plain yogurt and heavy cream, stirring to incorporate. Simmer for 15 minutes, stirring occasionally.
    Stir in the cornstarch and water mixture, and cook for another 2 minutes. Remove from heat to cool and thicken for about 5 minutes.
    Serve over a bed of white rice. Season with salt as desired.

    If you have leftovers, this is really yummy the next day. We mix any leftover sauce with the remaining white rice and refrigerate. The following night for dinner we dip tortilla or pita chips in it. It's really good. You should try it.  

    I linked up at Tastetastic Thursday on A Little Nosh. 

    Tuesday, October 25, 2011

    The One With the Famous Sub Sandwiches

    Sorry, folks, for the delay in posts. Last week we celebrated Steve's birthday so there was not much time for posting. However, I thought I'd share some of his favorite foods that I made all weekend for the occasion.

    First off, Michelle's Famous Sub Sandwiches. I'm not being vain, that's just what they've become known as over the years. These are one of Steve's faves, so we had them for dinner Friday night. I get asked for this recipe a lot, so here it is... in all it's glory. I even included all the tips I have come up with from perfecting this baby over time.

    (The picture is kinda crappy, but I have yet to meet anyone who thinks the sandwich is.)


    Michelle's Famous Sub Sandwiches

    You will need:
    • French or Italian bread - whichever is softer and thinner in your bakery
      One loaf usually feeds 2-3 people
    • Mayonaise
    • Honey-Dijon Mustard
    • Red Onion
    • Lettuce
    • Whole Dill Pickles
    • Deli-sliced Turkey
    • Optional: Tomatoes
    • Good Seasons All-Natural Italian Dressing
    Cut your French or Italian bread loaf (or loaves) horizontally, keeping one edge barely connected. Open up the bread and use a spatula to spread the mayonaise on both sides. Spread some honey-dijon mustard on at least one side, two if you like a stronger flavor. Chop a quarter of a red onion into little bits and sprinkle on both sides of the loaf (I think this method gives an overall better taste than rings of red onion). Put some lettuce on the bottom side. Slice up some dill pickles and lay them on top. If you're going to add tomoatoes, here's your chance.  Add a layer of the deli turkey.
    The next step is the most important: Good Seasons Italian Dressing. You could try other stuff, but I like this best. It comes in little seasoning packets in your condiments aisle and you mix it up yourself in a little container it comes with. Anyway, it is just wonderful. It is the secret ingredient. Douse your meat and veggie layer in this, fold up your sandwich, cut it into pieces and serve with pride. And napkins.

    These sandwiches are simply wonderful on hot summer evenings (no cooking involved!) served with some lemonade, beer, or maybe a cream soda. And might I suggest these for Superbowl Sunday? I think they would fare well among football fans of all ages.

    Monday, October 17, 2011

    The One With the One Dish Chicken Dinner

    I'm trying desperately to expand my horizons on the dinner front. Usually, I feel that if I'm going to put effort into a cooking/baking venture of some kind it better turn out chocolately (hence the focus on dessert). But I got a little tired of my unimaginative meal rotation, so I started hunting down quick recipes that I can throw together really quickly and everyone will still enjoy. I'm certainly no chef, but I figured there had to be some simple recipes out there that everyone would like. Enter, the one-dish chicken dinner.
    It's incredibly easy. And pretty tasty. Everyone approved.

    Preheat oven to 375 degrees.
    • 1 can Campbell's Cream of Chicken Soup
    • 1 1/3 cups water
    • 3/4 cup uncooked white rice
    • 2-3 cups frozen or fresh vegetables
    • 1/2 tsp onion powder
    • 4 skinelss, boneless chicken breast halves
    • cheddar cheese, shredded
    Stir together the soup, water, rice, vegetables and onion powder and pour into a 9x13" glass pan. Top with chicken. Season the chicken as desired (I used a poultry seasoning and some garlic salt). Bake for 45 minutes. Top with cheese. Serves 4.

    I found this recipe on a Campbell's Soup ad. And it's really quick and easy and warm. It will probably be a staple this winter. Not only is it comfort food, but it also has meat, grains and veggies in one dish, so it's pretty much a dream for moms with little time for dinner.

    Wednesday, October 5, 2011

    The One With the Veggie Casserole

    I'm pretty proud of myself for coming up with this recipe all by myself. Not like it's really an intricate concept, but I'm pretty happy that I made something edible from the remainders in my cupboards. Anyway, it turned out so good that I think I'll be making it more often.


    Easy-Peasy Veggie Casserole
    • 1 can cream of chicken soup (11 oz.)
    • 1 cup water
    • 4-5 cups vegetables, chopped
    • 5 russet potatoes
    • 1/3 cup sour cream
    • 3 Tbls butter
    • Garlic salt or other seasonings
    Preheat oven to 350.

    Combine cream of chicken soup, water and vegetables. I used a can of corn and a few cups of frozen mixed vegetables, but you could really use anything you want. Pour into an 8x8 pyrex pan and bake for 20 minutes. Meanwhile, thoroughly wash the potaotes and chop into cubes. To make the casserole more nutritious, do not peel the potatoes. Place in a 2-quart pot of water and bring to a boil over high heat. Keep potatoes boiling until you can easily insert a fork into them. Drain and use an electric mixer to whip. Add the sour cream, butter and seasonings to taste. It should be a little thicker than normal mashed potatoes since it acts as a crust. Remove the veggies from the oven and spread the potatoes over the top. Turn your oven to broil and broil for a few minutes to crisp up the top.


    This was an awesome dish for me and the girls since it was just us last night, but this would also be great on the side of steaks or with chicken added to the veggie layer.

    Thursday, September 22, 2011

    The One With the Tortellini Broccoli Salad and Bruschetta

    Even more party food recipes!
    On the menu last Sunday we had Tortellini and Broccoli Salad and Bruschetta - two of my favorite party foods. Pretty simple and pretty delicious.


    This recipe is party-sized, so if you're making it for dinner, halve it!
    For the Tortellini Broccoli Salad:
    • 2 bags frozen tortellini (19 oz. each)
    • 4-6 cups broccoli florets (depending on how much you like broccoli)
    • 2 cups cherry tomatoes, cut in half
    • 2 tsp chopped chives
    • 1 pound bacon, cooked and cut into pieces
    • 1/2 cup sunflower seeds
    •  Coleslaw dressing
    Prep the salad: Cook the tortellini, drain and set to cool.  Cut broccoli into bit-sized pieces. Cook and chop up bacon. Mix all ingredients together and toss with the coleslaw dressing. I like to make it pretty moist, but this part is up to you. Cover and refrigerate for at least an hour so that the salad soaks up all the flavor.

    Tip for preparing ahead of time: Cook  and cut up the bacon and the broccoli the night before. Do not cook the tortellini until the day of the party and then combine all ingredients just a few hours (at most) before the party.


    Bruschetta is one of my favorite appetizers and it is so easy!
    For a small gathering I will do just one baguette and for a party I'll use two. Again, the recipe listed below is party-sized.
    For the bruschetta:
    • 2 baguettes
    • 1/4 cup olive oil
    • 2 Tbls lemon juice
    • 3 cups diced roma tomatoes
    • 1 cup diced red onion
    • 2 Tbls basil
    • 4 garlic cloves, finely chopped
    • Salt and pepper to taste
    Combine the oil, lemon juice, tomatoes, onion, basil, garlic, salt and pepper. Mix together well. I like to make this either the day before or at least a few hours before so that all the flavors mix together really well. Right before serving time, cut the baguette into thin slices and broil until lightly toasted. Spoon the mixture onto the toasted slices and serve with a smile. :-)

    As a side note: the other salads featured where a Caesar salad and a pasta salad. I just make up the ingredient amounts as I go, but for the Caesar I use chicken grilled with garlic salt and oil, lettuce, parmesan, croutons and, of course, Caesar dressing. The pasta salad is a recipe from Mallory and just uses the pasta of your choice, tomatoes, red onion, olives, cucumbers, feta cheese, diced salami and Italian dressing in the quantities you desire.

    This pretty much ends the food-related birthday posts. And just in case you think I'm a one-woman show, I'd like to take this moment to say a HUGE thank you to Allison, Mallory and my mom for all of their help in the kitchen. And a big thanks to Steve for entertaining babies, too. I love you all!
    Related Posts Plugin for WordPress, Blogger...