Showing posts with label Paper Crafts. Show all posts

Friday, December 21, 2012

The One With the Atlas Wreath

I made this before Thanksgiving and am just now on top of things enough to show you. And even though it's late, I think it turned out pretty cool.

I saw the idea at a DIY Christmas show I attended with my mom. The designer behind Inspired by Ellee was there showing us all kinds of cool stuff (seriously... the things she did with chalkboard paint = very fun!). But my favorite thing she had on display was an atlas wreath with the word "Peace" (as in Peace on Earth) in the middle. I spent the next day searching all over my hometown for book of atlases so I could make my own.
An old picture frame from goodwill, some wooden letters, glitter and a hot glue gun later, I had my atlas wreath. And I really love it. Although mine is more like Joy to the World.

I accented it with some of the trees I made last year for my Glittery Christmas Village, and a nativity from my grandmother. And even though I made this for Christmas, it might stay up a little longer than that. It's nice that it's not super Christmas-y color-wise, so I could probably get away with it for a bit. Right?

O, and this is what Olivia saw in the living room that she described as "berry cole" and "beau-iful." I have to say I quite agree with her.

Friday, March 2, 2012

The One With the Watercolor Invitations

Olivia turned one yesterday. The only thing keeping me from crying that my baby is growing up too fast is planning her birthday party. I like parties. They're fun.

For Olivia's party, I'm using teal, aqua, mint and gold for the color scheme. Mostly oceany colors with gold as an accent for a little sparkle and pizazz. Anyway, I thought some watercolor invitations would be pretty, especially after I saw these adorable cards. So I made some of my own:
Didn't they turn out so well? I love them!
They're really pretty easy to make. All you need is:
  1. Watercolor paper
  2. Colored pencils
  3. Watercolors (Crayola works just fine)
  4. Medium flat brush (a sponge brush will suffice)
  5. Painter's tape
To begin, you need whatever design and wording you want to use. While on my party supply hunt, I found an adorable Etsy shop called A Fabulous Fete.  Lauren is awesome and does beautiful calligraphy. I love pretty much everything about her little party store. So I asked her to write out the front of the card. I played around with it on Photoshop until it was in the layout I liked and then printed it.
Here's how to make the cards:
  1. Use a colored pencil to trace your design onto watercolor paper. You can tape the design up against a window and trace it that way. Or, if you have a glass table, just put a lamp underneath it so you can trace your design. You must use colored pencils - the wax keeps the watercolor from adhering to that part of the paper, so your lettering shows up clearly. If you're working with thinner lettering, like I did, I would recommend using a a dark color so that everything turns out well. Thicker lettering lends itself better to the original idea, which is to use a white colored pencil to create negative space in your design.
  2. Use painter's tape to secure your paper to your work area. I'm classy and used cardboard boxes. 
  3. Get your brush wet, but not too wet, and dip it in the paint. Mix the paint however you like on the paper. I used a combinations of blues, yellow and white to get the effect I wanted. Experiment until you find the look you like.
  4. Let your paint dry for a few minutes. If the paint is too dark and the lettering is not showing up well you can use a paper towel to dab away some of the paint. 
Beyond that, it's up to you. I put mine on cardstock and added the party information to the back. I would suggest setting the cards under a heavy book in order to flatten them out, since the watercolor causes the paper to warp.
I shared this at Tip-Toe Thru Tuesday on Crayon Freckles. 

Wednesday, December 7, 2011

The One With the Glittery Christmas Village

What is Christmas time without a little glitter? Or a whole glittery village for the mantel?
Oh, yes. I love it. It's pretty and glittery and Christmas-y and fun. And you could make one yourself, if you like. All you need is:
  • Cardboard cones in at least two different sizes (available at craft stores like Craft Warehouse, or you could make them yourself)
  • Wooden bird feeders that look like houses, with the peg for the bird to perch on removed
  • Sponge brushes
  • Elmer's glue
  • Loose glitter - I used eight colors for my village: silver, pink and green for the trees, with another random multi-colored glitter I had lying around; and sandstone, white, brown and gold for the houses
  • Tiny silver plastic ornaments to top the trees with the part that hangs them cut off to leave a whole so you can place them on top of the trees  (I used the dollar packs from Target)
  • A cardboard box like your cereal comes in for the doors and windows
  • A hot glue gun and glue, obviously
  • Newspaper or an old magazine to cover your workspace and make returning glitter to its original container easier
  • Friends DVDs or Christmas movies to watch while you're working
Making the village is rather simple. Maybe a little time consuming,  but I did all of this over two days in about 5 hours total. It's a great project to do with friends or while babies sleep. Here's how to:

For the trees:
  1. Fold a piece of scrap paper in half, then open it up and place it under a cone. 
  2. Use a sponge brush to paint an entire cone in Elmer's glue. 
  3. Shake the glitter all over the cone until it is covered. Tap to remove excess glitter, check for bald spots and then place on some newspaper to dry. 
  4. The excess glitter should have collected on your scrap paper. Pick it up and dump it back into your glitter container so you can use it for the next tree. 
  5. Repeat for as many trees as you want to make. Make sure to get several of each color in varying sizes.
  6. Once each tree has dried, top it with a glitter ball. 
For the houses:
  1. Remove all the little perch pegs from your houses. They are likely just glued into a small hole, so some good wiggling should do the trick.
  2. Using your sponge brush, paint the rooftop with glue and then sprinkle with white glitter. For me, I had to do two coats of glitter because the white was too translucent. Two coats should make your rooftop look snow-topped. Just be sure the first coat has completely dried before moving on to the second. 
  3. After your rooftops are dry, shake off any excess glitter and paint the front, sides and back of the houses with glue. It may be helpful to cut your sponge brush down to get in the little nooks and crannies. Sprinkle the sandstone glitter all over. Let dry.
  4. While your houses are drying, make the door and windows: Cut whatever shape doors and windows you want out of the cardboard box. Coat with glue and glitter - the brown for the doors and the gold for the windows to be like a light inside the house. Make sure these doors and windows are big enough to cover the holes that the bird seed would go into. Once the gold on your windows has dried, dip the edges in a very shallow puddle of glue and then into the brown glitter to make the window edges. Once everything is completely dry, use a hot glue gun to adhere the doors and windows to the houses.
Voila! There you have a perfect little Christmas village. You can place it on loose glitter snow or swirl a white garland through the village to make it seem snowy.

Thursday, October 6, 2011

The One With the Birthday Party Invitations

I realized I forgot to show you the party invitations for Mallory and Ellie's birthday party.
I designed them myself and sent them in bright pink envelopes. Pretty straightforward, but also fun. And I'm in love with the font I used. You'll probably see it around a bit more.

Friday, August 12, 2011

The One With Jake's Silhouette

 I love silhouette art. It's so clean and classy.

My friend, Betsy, asked me about doing a silhouette of her son, Jake (Ellie's BFF). I was happy to try again. I hadn't done once since Ellie's, but now I'm hooked and want to do many more. Look how well it turned out! I started with this picture, plus another profile picture that showed me the back of his head:

And ended up with this:
Cool, huh? These silhouettes are rendered by me and then hand-cut and assembled with the name and background of your choice and is available in in my Etsy shop. All I need from you is a profile picture of your child! Email me if you want to get started now!

Thursday, May 12, 2011

The One With the Photo of the Day (May 12th)


Thanks to my sister-in-law, Annette, I have a new obsession with tissue poms. I've been making them for all sorts of things the past couple of days. Here are a few I made for the graduation party. 

Wednesday, May 11, 2011

The One With the Photo of the Day (May 11th)


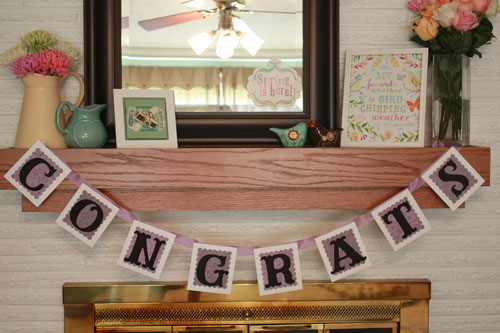
Banners like these are all the rage right now. And I can see why. They're so easy to personalize and fun to make. This is the one I made for a friend's graduation party. I chose purple, black and white because she graduated from my alma mater, The University of Portland. And I have a lot of Purple Pride. And she is a Laker's fan, so it was kind of a win-win. Except that there wasn't any yellow at the party.

The possibilities with these are endless. I have a feeling any party I am involved with in the foreseeable future will feature one of these. And wouldn't these be adorable in a nursery, with the baby's name draped around the crib? Ummm... yes.

If you are interested in having a banner made for a party or for decoration, comment on this post or message me and we can work something out! I would love to make one or several for you.

Tuesday, January 11, 2011

The One With the Personalized Notebook

I seem to have a recurring problem. Although I think notebooks are a great way to stay organized, I can never seem to find one that would allow me to have the sections I want to organize the kinds of things I need organized. Solution: DIY Personalized Notebook.

This is the one I made for my friend, Mallory, for Christmas.
I used blue and green scrapbooking paper to decorate the front and tabbed pages, since those are her favorite colors. Think of the personalization possibilities! You could completely customize the look to get exactly what you wanted.
(Please excuse the shininess. That's a result of the lamination and the camera's flash.)
I listened to Mallory's ideas of things she wanted to keep track of for a few weeks and then decided on the following tabs:
  • Recipes (she loves to bake)
  • Home Inspirations (for products or room ideas she might want in her future house)
  • Projects (we're always collecting them from blogland and beyond)
  • Gifts (she's an amazing gift-giver, partially because she listens to what people talk about and keeps track of things she thinks they might like - now there's a whole notebook section to make that easier for her. Now she can keep track of gift ideas when she sees them months ahead of the time she'll need them.)
  • Addresses (everyone has addresses they need to keep handy)
  • Miscellaneous (I included this tab for any random thoughts, quotes, inspiration or scheduling reminder she might want to jot down)
This is what the individual tabbed pages looked like. Inside each tab I included blank white pages - but these could be personalized, too.

In retrospect, I should have added a pocket in the front or back since she's always hanging onto sale ads so she can use them at the right time. It would have been a great addition to make this even more useful.
If you make yourself one, you can get them bound at your local Staples or Office Depot - anywhere with a printing center should be able to do it. Keep in mind that if you use chipboard for any embellishment, it cannot be laminated. Stickers and paper are a better route.

Next up, I'm going to make myself one - and hopefully, with a little perfection, I'll be offering these in my upcoming Etsy shop very soon.

Monday, November 29, 2010

Now Available at the Artisans for Nicaragua Craft Fair!

Mallory and I are participating in a fundraiser for the Nicaragua Immersion program at the University of Portland. We are selling the following items.

Flower hairpieces with a clip and pin back. You can wear them in your hair or on a jacket or even on a headband, as Ellie so nicely demonstrates below.


Snuggle Baby Blankets: Made of soft cuddle fabric on one side with a patterned flannel on the other and a satin ribbon trim. These blankets measure 1 sq. yard and are the perfect size to keep in the carseat for cold winter drives. They heat up quickly and keep little ones warm.


Clutches and makeup bags available in many different prints!


We will also be selling baked goods (like cupcakes, almond toffee, poppyseed muffins, pumpkin spice rice crisipies and more) and handmade cards.
Come by and see us in the Franz lobby all week long between 11:30am and 1:30pm!

Thursday, May 20, 2010

The One with the Photo Book

I'm all about sweet and simple gifts. For our recent graduation from college, I wanted to commemorate some of the wonderful times I have had with my girlfriends. Of course, with a baby, finals and a husband also trying to graduate, I didn't have much time for an elaborate gift nor did I have a lot of money for something expensive. My solution: Handmade Photo Books (x3). I loved them so much I made one for myself after graduation.My idea evolved as I worked: I started out with a stack of 4.5 x 6.5 inch photo frame cardstock from Michael's. I knew I wanted to have them bound together in some form, so I cut 4.5 x 7 inch white card stock to mount my frames and pictures on. The extra .5 inch in length was for the binding in the end.After mounting each photo and frame on either sides of the white cardstock, I made little, handwritten labels. Normally, I am far to obsessive to write my own labels in my scrapbooking attempts, but I did for this because I wanted it to be as reminiscent and hand-made as possible.

When that was all said and done and I headed to our school's graphics lab to employ cheap production while I still could. However, this would not be expensive to do anywhere (another thing that makes this gift so great!)I used a cold laminating machine to laminate the cover and back page in order to protect the book. (A hot laminating machine did not work because of the multiple layers of the sheets). Beware the cold lamination - at least the stuff I used -has only one transparent side, so you can't have a picture on the backside of your lamination.)

After the lamination, I took the cover, back and all the inside pages to have them bound in a print shop. It cost me about $3 to have all four photo books bound. Be sure to specify that you want a loose comb binding - don't let them bind it too tight or it will be difficult to use and won't lay flat when you're finished.

This project is so simple! You could easily whip one together for a friend's birthday or to commemorate an event or vacation. I love that it doesn't require the same level of commitment as a scrapbook can: it only has to be as big as you want it to be and it is much less expensive to put together.

And the finished product looks great in any living room!
Related Posts Plugin for WordPress, Blogger...