Showing posts with label Holidays. Show all posts

Monday, January 5, 2015

The One With the Homemade Holiday Gifts

As much as possible, I really love to give handmade gifts. But I also really want to give practical gifts that people enjoy. People not liking the gifts I give them is one of my biggest fears in life. (So if I gave you something you hate, please just regift/donate/toss it without telling me. Or maybe tell me so I can do better next time? Idon'tknowanymore.)

Anyway, last Christmas Henry was the crankiest ever and so I just didn't have much time or ability to put into thoughtful gifts, and it wasn't very fun. I felt bad getting really creative, wonderful gifts and giving a gift card in return. Sad day. This year Henry was more cooperative and I finally felt that I had the time and creative energy to make a lot of the gifts we gave.

I discovered the wonder that is Creative Market, which enabled me to do most of these projects. I got all the elements from various artists there (see source list at bottom of post), and just got to design them in whatever way I wanted.  And it was really fun! I hope the recipients appreciated getting them at least half as much as I enjoyed making them!

Here's a sample of a few things I made this year:

^^ I made these family crests for three couples and paired two of them with one or the other
 of the feather wreathed quotes. I got to see  the first two hung up in Stephanie Stucke's 
adorable New Hampshire apartment and it totally made my day! 

 ^^ I made this initially for my friend Betsy's birthday. Then I made a copy for my mom. 
And one for me, because this is such a good reminder. 

 ^^ I made this for my sister-in-law Emily's birthday. This one is extra special because it 
has the names of each family member printed in the feathers of the arrows. 
I love it. Might need to print one of our family. 

^^ This quote (or possibly collection of quotes?) by Theodore Roosevelt is displayed in the 
foyer of the Museum of Natural History in New York City. I fell in love with it while we 
were there and was so happy to make this print for my son's room. It turned out so well that 
I thought I'd give it to a few other boys I know. 

^^ This one went to a friend who loves feathers and brings people a lot of hope. Love you, Jo!

^^Each print was framed up in various ways. I tried to frame them to match any existing decor 
of the person/family to receive them. 

Yay or nay these prints? I'm really loving all this natural/woodsy theme that seems to be popular right now.

If you're interested in a personalized copy of any of these for yourself, contact me! I love to make these things!

Creative Market Design Sources:
Say Less Font // Just Be Cool Font // Watercolor Texture Pack // Watercolor Flower DIY Pack Vol. 2 // Watercolor Wedding Collection One and Two

Monday, February 11, 2013

The One With the Valentine's Treat Bags

Valentine's Day is one of my favorite holidays. Well, except that all holidays are probably my favorite.
I saw a tutorial on Oh Happy Day to make these little treat bags with the initial of the recipient on them. I loved the idea and ordered the supplies on Amazon Prime (muslin drawstring bags, and black and pink paint pens).

Paint pens are my new favorite. I used an alphabet that came in a notebook from Target, which is also very pretty.

Didn't they just turn out the cutest? I can't wait until they arrive at all their intended destinations.
Each was filled with some candy and chocolate (obviously). And a little paper heart with a note on it was enclosed as well. Sweet and simple. Just the way I like it.

I hope Ellie and Olivia like them, too.

Thursday, March 8, 2012

The One With the Thin Mint Mousse Cups

Well it's that time of year again. That wonderful time of year when Girl Scout cookies make their lovely reappearance in the world. I thought I might celebrate this momentous occasion with some themed mousse cups, because, well, they're yummy.
Thin Mint Mousse Cups
  • 1 large (5.6 oz) package chocolate pudding mix
  • 1 small (3.4 oz) package vanilla pudding mix
  • 2 cups whipping cream
  • 4 cups cold milk
  • 1/3 cup sugar
  • 1/2 Tablespoon Mint Extract*
  • 6 drops green food coloring
  • One sleeve of Thin Mints**
  • Chocolate shavings, for garnish
Prep the layers:
In a medium size bowl, whip 2 cups of cream and 1/3 cup sugar on high for about 4 minutes, until stiff peaks form when you lift out the beaters.
In another bowl, combine chocolate pudding mix and 2 cups cold milk. Whisk for 1 minute to incorporate. Once the pudding begins to set and thicken, whisk in half of the whipped cream.  Set the other half aside for topping.
In another bowl, combine the vanilla pudding mix and 2 cups milk. Add the mint extract and green food coloring and whisk for 2 minutes until fully combined.
Let everything stand to completely set for at least 5 minutes.
Meanwhile, crush one sleeve of Thin Mints into medium-sized crumbs.

Assemble the layers:
Spoon two large spoonfuls of the chocolate mouse into parfait dishes, glasses or whatever kind of cup you have on hand. Add a layer of cookie crumbs. Next, add two large spoonfuls of the mint pudding and another layer of cookie crumbs. On top of that, the chocolate mousse and more cookie crumbs. Top with whipped cream and some chocolate shavings for garnish. Keep refrigerated until serving.

Makes 5 generous servings.
    *Mint Extract is not the same as Peppermint Extract. And mint really is better for this recipe. 
    **Even though this recipe calls for Thin Mints, I think it would be delicious with Oreos or Andes Mints        substituted in case you feel like making this during that dreary time of year when Thin Mints are no longer in your cupboard.

    This dessert is so refreshing. It would be perfect for St. Patrick's day... or really just a small dinner party. Of course you could always use a little less of each layer to make more cups for more people. I would recommend serving within an hour or two of assembly, although you could prep the layers up to a day in advance. Just be sure your whipped cream, mousse and pudding are stored in airtight containers in the refrigerator.


    I shared this recipe on Tastetastic Thursday by A Little Nosh and on Tip-Toe Thru Tuesday on Crayon Freckles. It was featured on the following Tip-Toe Thru Tuesday.

    Friday, January 6, 2012

    The Second One With the Restrospective Christmas Craft: Handmade Cards

    There was an error with my printing order for my Christmas cards, so I had to print some last-minute at Target. Eventually, I decided just to print some 4x6s of the girls and incorporate them into handmade cards for friends and family. Here are how a few of them turned out.
    The paper is from Craft Warehouse. And Target prints great photos, if you're looking for a place.

    Thursday, January 5, 2012

    The First One With the Restrospective Christmas Craft: Tree-rific Table Runner

    So since I missed a couple of Christmas-related posts due to being sick, roadtripping and moving, I thought I'd share them now. Better late than never, right? That's my philosophy this year since I also just sent out our Christmas cards. Yay for me. But at least this way you can keep all these fabulous ideas in mind for next year. Hehe.
    Also, do you like my clever name for this table runner? It's tree-rific, don' you think?


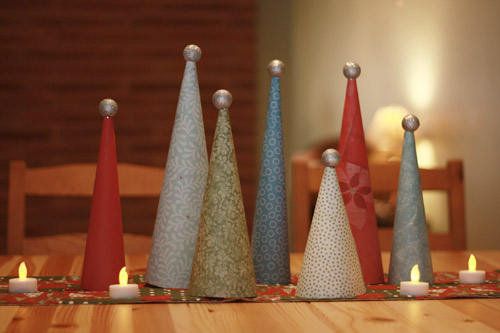
    You may have noticed that I have an obsession with trees, especially around Christmas time. So when I saw this Christmas tree fabric at Joann's, I knew that I had to get it and do something with it. Mallory and her sister Hailey had made some adorable table runners that I saw at their house so I asked her for the inspiration and she sent me this link to Tricky Tablerunner by Laura over at Spool. I made one for my mother-in-law's Christmas present. And I still have some left over fabric that will someday be turned into another variation of this table runner for someone else. I'll just go ahead and add it to the ever-mounting pile of "to-dos". Anyway... I do think it turned out pretty well. I staged it with my paper trees from last year's Christmas decor and some LED candles... because actual candles, when combine with grabby babies, have ruined my table runners in the past. :-(


    This is a really simple sewing craft if you're looking for a beginner's project, especially one to give as a gift. You can simplify it from the original by omitting the border and binding. Instead, make your top layer and cut your backing fabric to be the same size. Put your two sides face together and sew around three edges. Sew all but a few inches of the fourth side, clip your corners so that they'll lay nicely, and turn your fabrics right side out. Sew up the remaining few inches and you're done! Of course, this doesn't have to be limited to Christmas. Any fabrics could be used for any occasion. I think I need to make a spring themed one and hopefully convince some warmer weather to come our way. Our table is looking a little bare in our new house.

    Wednesday, January 4, 2012

    The One With the Chocolate-Filled Croissants

    A couple of years ago, on Christmas, I came up with the most brilliant idea ever: Chocolate-Filled Croissants. Ok, it's not like penicillin or anything, but I do like it a lot.

    The great thing about these is that they are so simple and easy to make, yet they feel really special. They are the perfect thing for Christmas morning, when you've likely gotten a late start on making breakfast but still want to make something a bit out of the ordinary.

    Chocolate-Filled Croissants
    • Croissants from the bakery of your grocery store
    • Milk chocolate chips or Hershey's Chocolate Kisses 
    Preheat your oven to 350 degrees. Use a knife to make a horizontal cut  into the croissants, leaving one side connected but creating a cavity to be filled with chocolate. Put some chocolate chips or Hershey's Kisses inside. (Kisses melt better, making the chocolate gooey-er. However, chocolate chips tend to retain a little more shape which gives the croissants a nice texture. Just use whatever you have on hand.) Wrap each croissant in aluminum foil and place in the oven for about 20 minutes, or just as long as you're making whatever else goes with your feast. Might I suggest scrambled eggs with tomatoes, green onions, chives and garlic along with berries and whipped cream, and of course, a side of bacon? It's our traditional spread. And it's awesome.

    There you have it. Christmas morning (or New Year's Day, or whatever special occasion) simplified.

    I linked this recipe up on Tastetastic Thursday #16 on A Little Nosh. 

    Monday, January 2, 2012

    The First One of 2012

     
    Happy 2012!

    I apologize that I've been a little MIA these past few weeks. I didn't want to worry anyone (sorry, Ellen!), but we have just been busy little bees. Christmas "break" was just about the farthest thing from an actual break. The whole family got the flu as soon as Steve took work off. Then we road tripped to Idaho to visit my family for Christmas. As soon as we made the trek back we moved into a new house. It has certainly been a crazy couple of weeks. I just unburied my laptop this morning... and still have a lot of unpacking to do.

    But I have been taking pictures for you so that I can post a few retrospective posts.

    First up: New Year's Eve cupcakes. How else would I ring in the New Year than with great friends, board games, s'moretinis and cupcakes.

    I just made chocolate cupcakes with a mint buttercream frosting and sprinkled them with some gold pearilized sugar.

    To make some Mint Buttercream Frosting of your own you'll need:
    • 1 pound (3 1/4 cups, loosely packed) powdered sugar
    • 1/2 cup butter, softened
    • 4-8 tablespoons milk or water*
    • 1 tsp vanilla extract
    • 1 tsp mint extract
    First, combine the butter and sugar. Add the vanilla and mint. Blend in the water one tablespoon at a time until you have reached your desired consistency. 

    *I don't notice much of a difference between the use of milk or water in this recipe. Some people think the milk makes it creamier, however, if you use milk the cupcakes must be refrigerated.

    I know I'm looking forward to 2012 and I hope that you are, too! I've got lots of great things coming up and hope you'll stick around, despite my recent absence. See you again soon!

    Wednesday, December 14, 2011

    The One With the Christmas Cards

    Well... Christmas is like next weekend. O my! How did it sneak up on us so quickly?!?! Anyway... it's past time to have made the Christmas card. So yesterday I made a few. Now, I love all of these, of course. And it was super hard to choose which one went to print. I let Steve have all power in that department. Seems only fair since I made them all. This one is my very favorite... but not Steve's. So it didn't get printed. But I still love it.
     This one is very similar to the one that did go to print. But just in case any of your are on our Christmas card list, I chose not to reveal the actual copy. 
    And these last two are just fun and casual. I like them, too. I also like that the picture is more goofy - but shows off the girls' personalities better.
    That last one looks a little familiar, maybe? I did a similar font style on Cyril and Liam's (see the end of that post).  And if you're interested, here's a link to last year's Christmas card designs.

    Monday, December 12, 2011

    The One With the Ornament Wreath

    I've been wanting to make one of those ornament wreaths for a few years now, and I finally got around to it. Thank goodness for the dollar section of Target. Their ornaments are the only way to go when making one of these - you need so many that it would be fairly expensive to use anything else.
    To make one yourself you will need:
    1. Styrofoam wreath for base
    2. Hot glue gun and glue
    3. Ornaments in three sizes
    Remove the part of the ornament that attaches to the hook to make them less bulky. Before you begin gluing, strategize a bit. Arrange your ornaments in a circle to make sure you have enough to cover the wreath size you have chosen. I began by gluing on the biggest ornaments, then adding the medium size ornaments. Finally, I filled in the nooks and crannies with lots and lots of tiny ornaments. As you go along, make sure you pick up your wreath and look at it from different angles to make sure you don't leave any big blank spots.

    You can hang it with a ribbon showing, or, like I did, you can hot glue a thin ribbon onto the back and hang it with that.

    I'm so glad I finally got around to making one of these. I originally wanted to do it in many colors, but eventually decided the silver would be more versatile in coming years, and therefore more worth my time. It took me a little over an hour and two burn blisters to make this. But now that the blisters don't hurt and it's hanging snuggly above the mantel, I'm pretty happy with it.

    P.S. This is also a great way to use old or somewhat damaged ornaments, because you can glue the damaged sides down so they aren't seen. Yay for recycling!

    Wednesday, December 7, 2011

    The One With the Glittery Christmas Village

    What is Christmas time without a little glitter? Or a whole glittery village for the mantel?
    Oh, yes. I love it. It's pretty and glittery and Christmas-y and fun. And you could make one yourself, if you like. All you need is:
    • Cardboard cones in at least two different sizes (available at craft stores like Craft Warehouse, or you could make them yourself)
    • Wooden bird feeders that look like houses, with the peg for the bird to perch on removed
    • Sponge brushes
    • Elmer's glue
    • Loose glitter - I used eight colors for my village: silver, pink and green for the trees, with another random multi-colored glitter I had lying around; and sandstone, white, brown and gold for the houses
    • Tiny silver plastic ornaments to top the trees with the part that hangs them cut off to leave a whole so you can place them on top of the trees  (I used the dollar packs from Target)
    • A cardboard box like your cereal comes in for the doors and windows
    • A hot glue gun and glue, obviously
    • Newspaper or an old magazine to cover your workspace and make returning glitter to its original container easier
    • Friends DVDs or Christmas movies to watch while you're working
    Making the village is rather simple. Maybe a little time consuming,  but I did all of this over two days in about 5 hours total. It's a great project to do with friends or while babies sleep. Here's how to:

    For the trees:
    1. Fold a piece of scrap paper in half, then open it up and place it under a cone. 
    2. Use a sponge brush to paint an entire cone in Elmer's glue. 
    3. Shake the glitter all over the cone until it is covered. Tap to remove excess glitter, check for bald spots and then place on some newspaper to dry. 
    4. The excess glitter should have collected on your scrap paper. Pick it up and dump it back into your glitter container so you can use it for the next tree. 
    5. Repeat for as many trees as you want to make. Make sure to get several of each color in varying sizes.
    6. Once each tree has dried, top it with a glitter ball. 
    For the houses:
    1. Remove all the little perch pegs from your houses. They are likely just glued into a small hole, so some good wiggling should do the trick.
    2. Using your sponge brush, paint the rooftop with glue and then sprinkle with white glitter. For me, I had to do two coats of glitter because the white was too translucent. Two coats should make your rooftop look snow-topped. Just be sure the first coat has completely dried before moving on to the second. 
    3. After your rooftops are dry, shake off any excess glitter and paint the front, sides and back of the houses with glue. It may be helpful to cut your sponge brush down to get in the little nooks and crannies. Sprinkle the sandstone glitter all over. Let dry.
    4. While your houses are drying, make the door and windows: Cut whatever shape doors and windows you want out of the cardboard box. Coat with glue and glitter - the brown for the doors and the gold for the windows to be like a light inside the house. Make sure these doors and windows are big enough to cover the holes that the bird seed would go into. Once the gold on your windows has dried, dip the edges in a very shallow puddle of glue and then into the brown glitter to make the window edges. Once everything is completely dry, use a hot glue gun to adhere the doors and windows to the houses.
    Voila! There you have a perfect little Christmas village. You can place it on loose glitter snow or swirl a white garland through the village to make it seem snowy.

    Tuesday, December 6, 2011

    The One With the Christmas Photos

    I got the girls all wrapped in lights for their Christmas shoot last week. And I just LOVE how the photos turned out. Could they be any sweeter?

    Friday, December 2, 2011

    The One With the Peppermint Brownies

    Christmas season is in full swing. Finally. I made some really simple and delicious brownies the other day and thought I'd share them with you.
    Andes Mints makes special white chocolate and peppermint candies for Christmas. They are like tiny bits of peppermint bark. Pretty awesome.

    So I unwrapped the candies and chopped them into small bits. I mixed 10 candies' worth into a regular batch of brownie batter. After I baked the brownies as directed, I sprinkled the rest of the Andes Peppermints on top while they were still warm, so they melted slightly onto the top.
     The best part about this really simple creation? It makes your kitchen smell like Christmas. Oh. Yes.

    Tuesday, November 8, 2011

    The One With the Baby Snoopy Costume

    I posted the girls' Halloween costumes earlier, but I wanted to show another view of Olivia's Snoopy costume. This costume is such a simple DIY project and costs so little. So if you're interested in creating your own Peanuts gang, here's how to:

    I used:
    • Aviator hat (Olivia's is from the Build-A-Bear Workshop, because she's as tiny as a teddy bear) - $7
    • Red scarf (came with the hat)
    • White sleeper (already owned)
    • Black felt for ears, spot and tail - $2
    • Woodstock that plays the Peanuts theme song - $5
    Total: $14

    Cut out a circle (5 inch diameter) for the spot and stitch it onto the sleeper. Cut out two tail pieces and sew them to each other for dimension, leaving about half an inch at the base unstitched so you can spread it and stitch it onto the sleeper. Cut out ear shapes and stitch them onto the aviator hat. For all of the stitching I used black thread. Don't worry about making it perfect - it only has to last a few hours (and in the end you can take out the stitching and you have your sleeper back).
    Use liquid eyeliner of black face paint to make a little nose on your baby Snoopy. To prevent your child from strangling him or herself with the scarf, use a safety pin to keep it in place so it can't tighten. And always  keep an eye on your baby while they're in costume.

    Ellie was dressed as Sally Brown. In fact, she started the whole thing by having Sally-esque hair that flips out in the back.
    • Blue dress (Pumpkin Patch) - $17
    • Blue socks (Target) - $1
    • Black shoes (already owned, from Payless)
    Total: $18

    We used a ton of hairspray to try and curl Ellie's bangs in the front to look like Sally's. They held up for about five minutes, just long enough to get some pictures.
    The best part is that all of these costume pieces (well, except the hat and scarf, I suppose), are reusable as regular clothes. I like that part a lot!

    Monday, October 31, 2011

    The One With Sally and Snoopy

    Happy Halloween!
    The girls are going as Sally Brown and Snoopy from the Peanuts gang. You'll have to be satisfied with Instagrams of their costumes for now.

    Aren't they the cutest?

    Ellie's costume: Dress: Pumpkin Patch, Socks: Target, Shoes: Payless
    Olivia's costume: White sleeper with a black flannel spot and tail sewn on (not pictured); Hat, scarf and Woodstock: Build-A-Bear Workshop. Yep, she's so tiny that she fits into teddy bear costumes. 
    Related Posts Plugin for WordPress, Blogger...