Showing posts with label Breakfast. Show all posts

Thursday, September 4, 2014

The One With the Dutch Baby Pancakes with Lemon Curd and Triple Berry Syrup

Dutch Baby Pancakes are probably my very favorite breakfast basic ever. They're super easy to make, but they puff up in the oven, so they're fun and seem kind of fancy. Kids love them. Adults love them. Everyone is happy.

But mostly I love them because they are so simple that they make a great canvas for all your delicious toppings. I feel like every couple of months I get hooked on a different favorite topping selection. Currently Whipped Cream Lemon Curd and Triple Berry Syrup are my go-tos.

I found the lemon curd recipe originally on Kitchen Confidante. I don't use the zest of two lemons like she does because you have to strain it out at the end and that's hard to do if you're cool like me and don't have a strainer. It seems to work just fine without it. The lemon curd recipe is fun because you can make it once and then keep it in the fridge for up to a couple of weeks, adding it to anything you can think of. It does take a little set up time, so be sure you make the lemon curd the night before, or at least first when starting to make breakfast. You could probably put it in the freezer to speed up the cooling process.


Dutch Baby Pancake
This is the most basic recipe, which serves 2 or 3 people. I almost always make 1.5 times this amount for our family, or I double or triple the whole thing depending on how many people I am feeding and what else I am serving. You can make these in glass pie plates or quiche dishes or Pyrex casserole dishes, or dutch ovens, which I'm pretty sure is where they got their name.
  • 1/4 - 1/3 cup butter
  • 4 eggs
  • 1 cup milk*
  • 1 cup whole wheat pastry flour
  • 1 Tablespoon vanilla extract

Preheat oven to 425 degrees. Place butter in a 9 inch cake plate and place in oven to melt.
Meanwhile, whirl the eggs on high for at least a minute, until light yellow and bubbly. Add milk, flour and vanilla and whirl until fully incorporated.
When the butter has melted, remove pan from oven and pour batter over the melted butter. Return to oven and bake for 18-20 minutes, until sides are puffy and dark golden brown, and a fork inserted into the middle of the pancake comes out clean. Serve as soon as possible.

*If you use dairy milk, this pancake puffs up so beautifully and the edges are really light and crispy and wonderful. If you use a non-dairy alternative like almond milk, the pancake still tastes delicious, but it won't puff up. It will be a little more dense and rich.


Whipped Cream Lemon Curd
  • 3 egg yolks
  • 1 whole egg
  • 3/4 cups sugar
  • 1/2 cup lemon juice
  • 4 Tablespoons butter, cut into small cubes
  • 2/3 cup whipped cream

In a small saucepan, whisk together egg and yolks until combined. Stir in sugar and lemon juice, whisking well until full incorporated. Place over medium heat and continue to whisk until custard thickens and coats the back of a spoon, about 8-10 minutes. Remove from heat and stir in butter pieces until melted and full incorporated. Allow to cool to room temperature and then place lemon curd in refrigerator for 1 hour to set up. Remove from fridge and stir in whipped cream before serving.

Triple Berry Sauce
  • 1 cup raspberries
  • 1 cup marionberries
  • 1 cup boysenberries
  • 1/4-1/2cup maple syrup
In a medium pan over medium heat, reduce the berries by letting them come to a boil and stirring occasionally. Over twenty minutes or so, the berries will break down and condense into a sauce. The longer you cook them, the more smooth and syrup they will become. (I prefer the syrup to be a bit chunky and thick, so mine is done in 20-25 minutes.) Add the maple syrup towards the end of your cooking. You can decide how much to put in based on how sweet you want the syrup (keep in mind the sweetness or tartness of your berries). Strain out the seeds if desired. Best served warm.

This syrup is another thing that can be made ahead of time and used for several weeks as long as it's kept refrigerated. 

Let everyone assemble their own dutch baby slices as desired. 

Tuesday, September 2, 2014

The One With the Raspberry and Chocolate Chip Scones

I don't know why scones seem kind of daunting sometimes. I especially don't know why after I make them and remember that they're actually super easy and quick to make. (Also, have you ever looked at the word "scone" for a long time? It starts to look really weird.)

Raspberry and Chocolate Chip Scones
Makes 12 scones
  • 2 cups whole wheat pastry flour
  • 1/3 cup sugar
  • 1 teaspoon baking powder
  • 1/4 teaspoon baking soda
  • 1/2 teaspoon salt
  • 1/2 cup butter, cold
  • 1/2 cup vanilla Greek yogurt
  • 1 egg
  • 2 teaspoons vanilla extract
  • 1/2 cup raspberries*
  • 1/4 cup chocolate chips
*Raspberries that are frozen will be the easiest to work with. They will keep their shape during the mixing process and will not bleed into the dough. You can use room temperature raspberries, but it will be messier.

Preheat oven to 400 degrees and line a baking sheet with parchment paper. Adjust oven rack to lower-middle position. 

Combine flour, sugar, baking powder, baking soda and salt in a large bowl. Sift thoroughly. 
Use a cheese grater to grate the cold butter into the flour mixture, tossing every so often with a fork. Use a fork or a pastry cutter to combine the butter and flour mixture until it is crumbly. 
In a separate bowl, combine the Greek yogurt, egg and vanilla extract and mix together. Stir this mixture into the butter and flour mixture, until all the liquid is incorporated. Do not overmix. Add the raspberries and chocolate chips and stir to combine. Dough will be thick and to incorporate the raspberries and chocolate chips, you may need to use your hands.

Turn dough out onto a flour surface and knead lightly into a ball shape. Coat a rolling pin with flour and use it to make a circle, about 1/2 inch thick. Cut circle into 12 triangles. Place on baking sheet and bake for 15-17 minutes, until golden brown.

Scones are excellent to make ahead or to send to school as a snack. 

Monday, June 17, 2013

The One With the Whole Wheat Strawberry Scones

We went strawberry-picking last week at Columbia Farms on Sauvie Island. It was our first time, but it won't be our last. It was so much fun! The girls were actually very helpful and picked lots of strawberries for their buckets. Of course, Olivia ate all of hers before they made it very far. But we were still able to bring home plenty to make homemade jam (yummy!), dice and eat with Greek yogurt and granola (our favorite breakfast these days), freeze some for future ice cream creations, and use some in our Whole Wheat Strawberry Scones that we made Steve for Father's Day brunch. And by "we" I mean that I made these scones all by myself. Sometimes Ellie likes to help in the kitchen. On Sunday, however, she did not.


We brought home a flat (about 10 pounds) of the Hood strawberries, which are deliciously sweet all by themselves, making them just ideal for baking as they don't require the addition of a lot of sugar. I modified my old faithful scone recipe to use whole wheat, turbinado (or raw) sugar, vanilla Greek yogurt, and, of course, these lovely berries. It turned out so well that we ate the whole batch in one sitting. And I thought I'd share it with you.


Whole Wheat Strawberry Scones

Adjust oven rack to lower-middle position and preheat oven to 400 degrees.

1/2 cup strawberries diced for the puree, + 1/2 cup strawberries diced small to add at the end
1/2 cup vanilla Greek Yogurt*
3 Tablespoons water
1 Tablespoon olive oil
2 teaspoons baking powder

2 cups whole wheat flour
1/4 cup turbinado sugar**
1 teaspoon baking powder
1/2 teaspoon baking soda
1/2 teaspoon salt
1/2 cup (1 stick) butter, cold
1 Tablespoon turbinado sugar for sprinkling

Grease a baking sheet and set aside.

Place 1/2 cup diced strawberries in a food processor and chop until a chunky puree. Combine puree with vanilla Greek yogurt. Stir in water, olive oil and 2 teaspoons baking powder and set aside.

In a separate bowl, use a fork to sift together flour, sugar, 1 teaspoon baking powder, baking soda and salt. Use a cheese grater to grate the butter into the flour mixture and then use a fork, a pastry blender or your fingers to combine the butter and flour mixture until it resembles a coarse meal.

Use a fork to stir in the strawberry and yogurt puree. Stir in diced strawberries. Once combined, shape the dough into 2 1/2-inch balls and then roll them flat (until they are a 1/2 inch thick) on a floured surface. (Or you can cut them into triangles as shown here.) Sprinkle with a light dusting of sugar and bake for 8-10 minutes.


These are pretty wonderful served with butter, and if you're feeling really exciting, strawberry jam. That's how Steve liked them. As you can see, we have a great affinity for all things strawberry in this house.

* You could substitute plain yogurt for vanilla, but if you do, add 2 teaspoons vanilla and use 1/3 cup turbinado sugar instead of 1/4 cup.
**You can substitute turbinado sugar for raw or refined, whichever you prefer.


Wednesday, March 20, 2013

The One With the Egg Quiche Cups

I love to make things in individual servings for parties. It eliminates some of the hassle of serving and also tends to make things easier to eat even if guests aren't sitting at a table. I've seen the idea of baking individual omelettes or quiches in cupcake tins and I thought I'd give it a try. It was so easy and really, really delicious. I've been making them since just for breakfast because you can do all the prep on just one day and then re-heat them throughout the week. If you haven't tried them, you really should.


Individual Egg Quiche Cups
Makes 15 servings
  • 6 eggs + 3 cups egg whites
  • 1 pound bacon, cooked and diced small
  • 1/2 red or yellow pepper, diced small
  • 1 tomato, diced small
  • 1 yellow onion, diced small
  • Pepper and garlic seasoning
  • Minced chives
  • Cheddar cheese, shredded
Preheat oven to 350 degrees.

Prepare cupcake tins by spraying with Olive Oil Pam. In a medium bowl, whisk eggs and whites. Feel free to add milk or water if desired. Pour into cupcake tins, filling each cup about 2/3 of the way. Sprinkle the bacon bits, pepppers, tomatoes and onions into each of the cups. Sprinkle the pepper and garlic seasonings and chives on top and bake for 20-30 minutes, until a fork inserted into the middle comes out clean, showing the eggs have cooked all the way through.

Just before serving, sprinkle the shredded cheese on top and return to oven for about five minutes, until cheese is melted and quiches are reheated. 

Additional serving options: dice up avocados or other relishes to be added by guests. And of course, ketchup is always a good idea for the ketchup lovers out there.

Monday, June 4, 2012

The One With the Pancakes and Nectarine Syrup

I've been a little wordy lately, so I'm going to cut to the chase. This is really simple and really good. You should try it. Especially if you've got some nectarines that are on their last leg. Just grill up some pancakes and drizzle them with this and some freshly whipped cream and you're good to go.
Nectarine Syrup
  • Nectarines (I used two and it served 4)
  • 1 1/2 Tablespoons of sugar per nectarine
Remove pit and dice nectarines medium. In blender, puree nectarines and add sugar. Blend for several minutes, until completely liquid.
My nectarines were past ripe, so they made a great syrup very easily. If you are using fresher nectarines, you may need to heat your puree in the microwave for 1-2 minutes to help it break down.

Freshly Whipped Cream
  • 1 cup heavy whipping cream
  • 1/4 cup sugar
Whip your whipping cream on high until it begins to stiffen. Add sugar. Continue to whip until stiff peaks form when you remove your beaters.
This is such a yummy twist on breakfast. It tastes so summery and fresh.  Even Ellie devoured it. And she's my toughest critic.
Check out my "Linked and Featured" tab to see where I linked this recipe up! 

Wednesday, April 25, 2012

The One With the Cinnamon Coffee Cake

Sometimes you need just a little extra push to make it to the weekend, you know? And sometimes you just want to have a yummy Friday morning breakfast with a good friend. Either way, this coffee cake seemed like a pretty good way to go. And I made mine lactosse-free. So yay!
Cinnamon Coffee Cake with Icing
Serves 10

For the cake:
  • 3 cups + 1 1/2 Tablespoons flour
  • 1 cup sugar
  • 1/2 teaspoon salt
  • 1 1/2 Tablespoons baking powder
  • 1 1/2 cup almond milk*
  • 2 eggs
  • 2 teaspoons vanilla extract
  • 3/4 cup plus 1/4 cup butter, melted (in separate dishes)
  • 3/4 cup brown sugar
  • 1 1/2 Tablespoons cinnamon
For the icing:
  • 2 cups powdered sugar
  • 5 Tablespoons almond milk*
  • 1 teaspoon vanilla extract
Preheat oven to 350 degrees.
Prepare your cake pans with butter and flour. I made mine in one 9-inch round springform pan, but it took about 50 minutes to bake. If you split it into 2 9 or 8-inch rounds, the baking time would decrease to 20-30 minutes.
Sift together 3 cups flour, sugar, salt and baking powder.  Using a mixer, blend in milk, eggs, vanilla, and 1/4 cup melted butter. Pour batter into your cake pan(s).
In a separate bowl, blend 3/4 cup melted butter, 1 1/2 Tablespoons flour, brown sugar and cinnamon. Drizzle the brown sugar mixture over the top of the batter and use a knife to swirl it into the batter, without mixing it in completely. I particularly like to let some of the brown sugar mixture pool at the edges. It creates an nice caramely crust.
Bake for 20-50 minutes, depending on which pans you used.
Meanwhile, prepare the icing: Whisk together the powdered sugar, vanilla and milk. Feel free to add more milk, one tablespoon at a time, if you want an even thinner icing consistency.
Once the cake is fully cooked and a toothpick inserted into the middle comes out clean, remove from oven and allow to cool in pan for 10 minutes. Remove from pan and drizzle with icing. Serve immediately. The hotter the better with this baby.

*Regular milk works just fine if that's what you've got. :-)
This is, like, really, really yummy. I know I say that about pretty much everything. But I wouldn't post it if I didn't like it. This one is especially good if you're hosting or attending a brunch. It's just that kind of special. And it is crazy moist and delish.
And so I'll probably make this for the next brunch I'm invited to. So if you want some but don't want to go to the effort yourself, feel free to invite me over for brunch. :-)

Check out my "Linked and Featured" tab to see where I linked this baby up! 

Thursday, April 12, 2012

The One With the Apple Puff Pancake

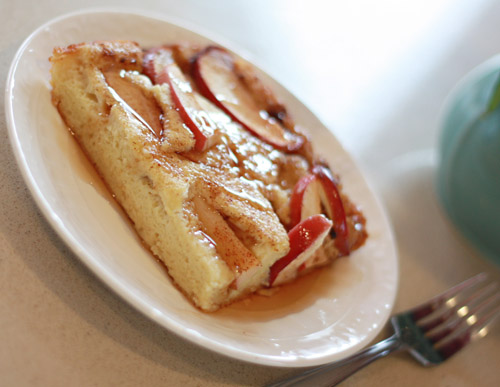
Around here we like breakfast. And apples. So last week I decided to try my hand at recreating a yummy breakfast dish my mom used to make. It is very similar to a Dutch Baby Pancake, but with apples and a little cinnamon sugar. It's a tasty and low-sugar way to add a little flair to the morning meal. 
Apple Puff Pancake
(Serves 6-8)
  • 1 stick (8 Tablespoons) butter
  • 6 eggs
  • 1 1/2 cups flour
  • 1 1/2 cups almond milk*
  • 1 Tablespoon vanilla extract
  • 2 large or 3 small apples, thinly sliced**
  • Cinnamon sugar to sprinkle
Preheat oven to 425 degrees.
Melt the butter in a 9x13 baking dish in the preheated oven.
Meanwhile, whirl the eggs with a beater on high for one minute, until frothy.
Add the flour, milk and vanilla and beat on high until fully incorporated.
Once the butter has melted in the pan, remove it from the oven. Pour the batter into the pan and rearrange the apple slices in rows until they cover the top of the batter. Sprinkle with a little cinnamon sugar and return to oven. Bake for about 20 minutes, until a fork inserted into the center of the pancake comes out clean.
Serve immediately with maple syrup.
*I like making this with almond milk because it is lactose free, but you could also use regular milk. If you do, the pancake will puff up quite a bit, which makes it really fun to eat. This may also require that you split your butter and batter between two 8x8 pans instead of one 9x13.
**I prefer to use Gala, Fuji or Pink Lady apples, but whatever is your favorite will be good with this. 
Also, the corners of this pancake, whether you use almond or regular milk, are the best parts. Since your family or friends won't know that the first time you make this, make sure you steal a corner for yourself!

Check out my "Linked and Featured" tab to see where I linked this recipe up!  
This recipe was featured on Miz Helen's Country Cottage and A Little Nosh. 

Friday, November 11, 2011

The One With the Petite Almond Scones

Apparently, creating the Egg-Free Chocolate Chip Scones last week has created some sort of addiction for me. I can't seem to stop making them. Or eating them. While preparing some last week I was reminded of Starbucks' Petite Vanilla Bean Scones and thought I'd like to try making something similar. And so I did, only instead of vanilla, they're almond (because almond flavoring is so very amazing). And these ones are egg-free, too! (Just in case you're like me and absolutely refuse to go grocery shopping.)

Egg-Free Petite Almond Scones
  •  2 cups all-purpose unbleached flour
  • 1/3 cup sugar + 1 tsp for sprinkling
  • 1 tsp + 2 tsp baking powder
  • 1/4 tsp baking soda
  • 1/2 tsp salt
  • 1/2 cup (1 stick) butter, cold
  • 1/2 cup plain yogurt (or sour cream)
  • 2 Tbls water
  • 1 Tbls olive oil
  • 2 tsp vanilla extract
  • 1 tsp almond extract
Adjust oven rack to lower-middle position and preheat oven to 400 degrees.
In a medium bowl, mix flour, 1/3 cup sugar, 1 tsp baking powder, baking soda and salt.
Use a grater or chop the butter into small pieces and use your fingers to work in the butter until the flour and butter mixture resembles coarse meal. A pastry cutter might also come in handy for this part.
In a small bowl combine sour cream, vanilla and almond extract, water, olive oil and 2 tsp baking powder. Using a fork, stir the sour cream mixture into the flour and butter mixture until large dough clumps form. Be careful not to over-work the dough. Use your hands to mold the dough into a ball. Lightly flour a cutting board or some other surface and press the dough ball until it is flattened, but still about an inch thick. Use a rolling pin to smooth out the top. Use a sharp knife to cut into 12 triangles. Transfer onto a parchment paper-lined baking sheet and place in oven. Bake for 15-17 minutes, until golden. Cool for 5 minutes and then serve.

While the scones are in the oven, make the

Almond Glaze
  • 1 1/2 cups powdered sugar
  • 3 tablespoons water
  • 1/2 Tbls almond extract
Use a fork to mix together the powdered sugar, water and almond extract.If you need to thin the icing, add more water, one tablespoon at a time, until it reaches the consistency you desire. Once the scones have cooled, drizzle the glaze over the top for the perfect touch of sweetness.

P.S. These for breakfast would be a fantastic way to celebrate 11-11-11 day! Just sayin...

Tuesday, October 18, 2011

The One With the Pumpkin Spice French Toast With Chocolate Glaze

I'm not very in to fall this year. Actually, I'm pretty bitter over summer's end. Normally I like fall just fine, but last year's seemingly-endless winter has made the thought of plunging into nine months of rain and darkness less than thrilling. So I've waited until now to start baking like it's October. However, this little dish might just change my tune. In fact, I would consider myself much more apt to welcome fall now that this is on the menu:

Pumpkin Spice French Toast with Chocolate Glaze:

And it's pretty simple, so you should try it next Saturday morning. I'm sure you won't be disappointed.

For the Pumpkin Spice French Toast:
  • 4 eggs
  • 1 cup milk
  • 1 tsp sugar
  • 1 tsp salt
  • 1 Tbls pumpkin spice
  • 10-12 slices of buttermilk bread*
Whisk all ingredients together in a shallow dish. Prepare a pan or griddle by melting 1/2 tablespoon of butter over medium heat. Dip a slice of bread into the batter, coating both sides, and then place on the griddle until brown. Flip the slice over to brown the other side. Repeat with all the bread you have batter for, adding more butter to the pan or griddle as necessary.

*I initially tried using a whole wheat bread, but the flavor of the pumpkin spice was not very strong, so I ended up opting for a white bread.

For the Chocolate Glaze:
  • 1/2 cup powdered sugar
  • 2 Tbls butter, melted
  • 3 Tbls cocoa powder
  • 2 Tbls milk
  • 2 Tbls water
Use a beater to combine the powdered sugar, butter, cocoa and milk until smooth. Add water, one tablespoon at a time, until the glaze reaches the consistency you desire. I used 2 tablespoons to get it to a syrupy consistency.

Serve with whipped cream and hot chocolate for a cozy, autumny start to your morning. 

P.S. This is my very own recipe that I made with Steve's help after discovering we were out of regular French toast ingredients. I would love to know what you think if you try it!

Tuesday, October 11, 2011

The One With the Dutch Baby Pancakes

A few days ago Mallory posted about making Dutch Baby Pancakes for her sister and I was reminded of how yummy they are. So I made them for Ellie and myself the other day. They are so easy and delicious.


Preheat the oven to 400 degrees.

Ingredients:
  • 1/3 cup butter
  • 4 eggs
  • 1 cup milk
  • 1 cup flour
  • 1/2 Tbls vanilla extract
Place the butter in a 9x13 inch pan and place in oven to melt. Use a blender to whirl the eggs for at least one minute. Add the milk, flour, and vanilla. Blend to incorporate. Once the butter in the pan has melted, remove from oven and pour the batter into the pan. Return the pan to the oven and bake for 20 minutes.

You can make this with almond milk or another milk substitute, although it may not puff up as nicely. It will still taste pretty good, though. No matter how puffed up the pastry gets, the butter gives it a nice, crispy edge.

The traditional way to serve these is sprinkled with lemon juice and powdered sugar. Of course any regular pancake topping like maple or chocolate syrup or strawberries and whipped cream would also be delightful.
Related Posts Plugin for WordPress, Blogger...